A partly-cloudy western sky made me anxious as I approached the famed Mirror Lake at Indian Henry’s Hunting Ground, Mt. Rainier National Park. Could a mackerel-like sky develop? A lenticular cloud above the peak? Would there even be sunset light on the mountain? This was my 10th or 11th trip to Indian Henry’s over many summers, and every sky, every evening, every play of light from this close-up Mountain view is a fresh experience.
Four hours before we hit the trailhead at Kautz’s Creek. It’s seven miles and 3,200 vertical feet gain to the Mirror Lakes, and, because we had a cross-country permit to camp in the Pyramid Mt. zone, it’s another ½-mile in to find a camp. Sunset was at 8:10pm. It’s a good thing I’d been running stairs the last few months.
I arrived at the fabulous Mirror Lake reflection tarn with just minutes to spare. Not a single cloud hovered near the mountain (sigh). Potential sun-blocking clouds lurked to the west. I’d call it a lousy scenario, but at least the Mountain wasn’t in fog. Still, I felt the pangs of a likely photo bust, and the mosquitoes were driving me frantic. I set up the tripod anyway, and auto-bracketed a series of horizontal and vertical-framed images, each with a two-second delay. I used the delay period to wave my hand in front of the lens and keep the mosquitoes from registering further insult as annoying OOF blobs in the images. The setting sun warmed the Mountain for a bit (yay!), but when a pink, post-sunset cloud rolled nicely over the summit, Mt. Rainier had already gone stone-cold gray.
In the morning we hiked out. I had little hope of producing anything inspiring. The sweat and mosquito prerequisite of Indian Henry’s means there isn’t a torrent of Mirror Lake images out there, so I think the trip is worthwhile regardless. I even enjoy the sweat (though not the mosquitoes). I feel like it’s my own backyard.
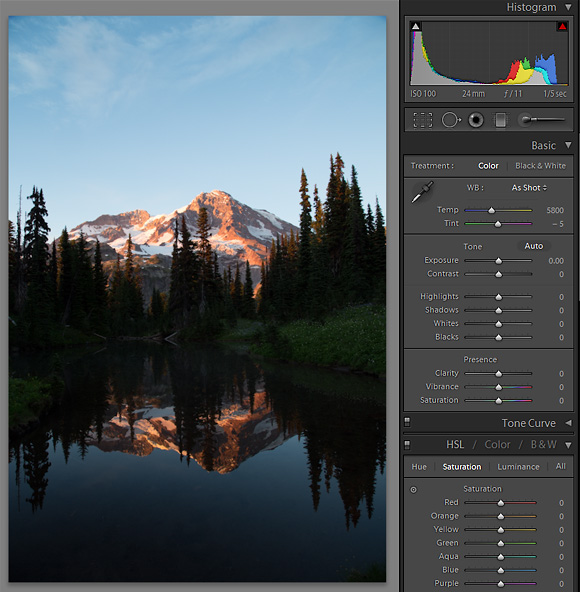
In the office I load the images in Lightroom, processing a few RAW selects. For this tip, I picked a vertical image (think magazine cover) that had the warmest light on the peak (Panel 1). Because I bracketed (one over, one under), I could combine two or several exposures in Photoshop, but I picked an image with a histogram that I can work with solely in Lightroom 4. I begin by applying a scenic preset, one that adds 30 points of saturation, and some correction for highlights, shadows, sharpening and chromatic aberration—basic stuff.

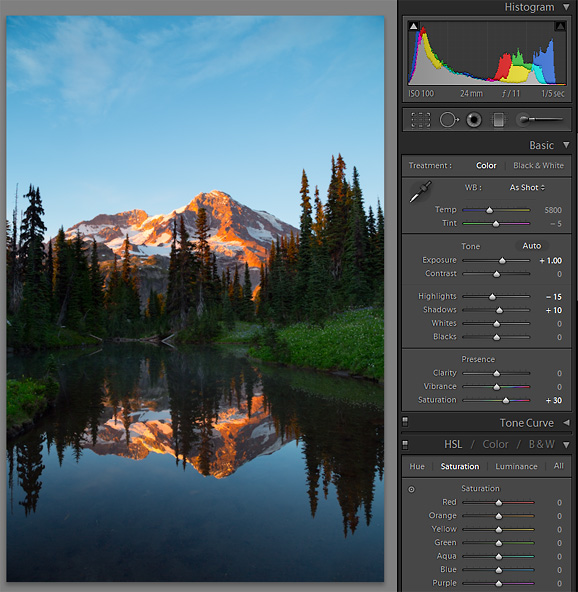
Next, using the Adjustment Brush, I selectively darken the sky and sunlit Mountain one stop (Exposure=-1). I don’t use split filters any more, and balancing the reflected light in the water with the sky is just about a stop. Then—because the overall image was now dark—I push the exposure slider over to a +1. I also remove a tuft of grass in the lower right with the Spot Removal tool, and straighten the horizon .6° with the Crop Tool. The resulting image looks good (Panel 2), but lacks punch and power despite the extra color saturation. It also lacks mystery, partly because I increased the overall exposure, and added some shadow fill when I applied the preset. I’ll add some punch, and put the mystery back in next.
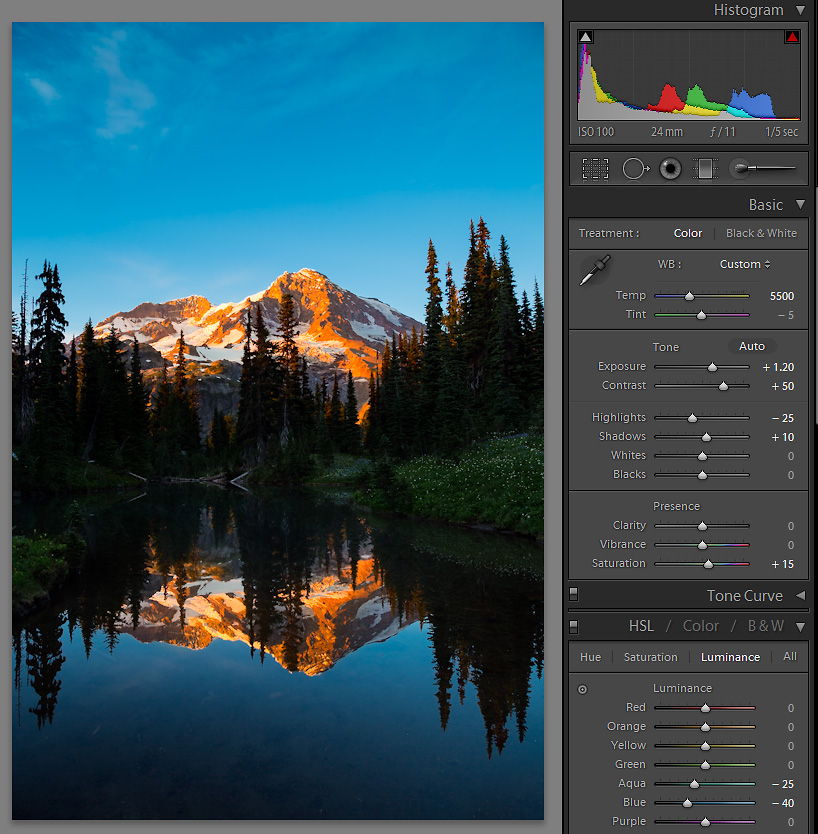
One way to punch an image is by heightening color contrast: red-green, blue-gold, yellow-violet. In this case we have the warm orange tones on the Mountain, and the cool blues and greens of the sky and the sedge. Accentuating the difference can be achieved easily in Lightroom 4, specifically with the revamped Adjustment Brush tool. Using it, I select the warm tones in the Mountain (and reflected Mountain), and move the Brush Temperature slider to the right (warmer) by 40 points. I then cool the entire image by reducing the overall White Balance (WB) Temperature in Treatment from 5800 to 5500. The color contrast now looks good to my eye. To add the mystery I was looking for, I increase the Contrast to a +50, which darkens the trees. This slider movement of Temperature and Contrast, however, has the effect of over-saturating the orange hues, so I decrease overall Saturation to +15. Again, looks good to my eye.

I feel the greens are too saturated and need to be further deemphasized, so I scroll down to the HSL panel, click on Saturation, and pull the Greens only down to -34. Then—for a deeper blue in the sky—I switch to HSL Luminance, and pull down the Blue (-50) and Aqua (-30), darkening the sky for even more contrast with the warm sunlit Mountain. All this additional contrast has created a lighter sky relative to the pond-reflected light, so I go back to my first Adjustment Brush pin and pull down that Exposure from -1 to -1.2, and then put back some overall light by upping the Treatment Exposure to +1.2 (Panel 3).
That’s it. Some head-scratching regarding what might wake the image was time well-spent. I’m pleased with the result. The processing was straight-forward. The steps I took should be routine for those who use Lightroom (4) frequently. And I’ve found my anxiousness regarding the shoot was unwarranted. There are so many looks to Mt. Rainier. I shouldn’t have worried.
Gary