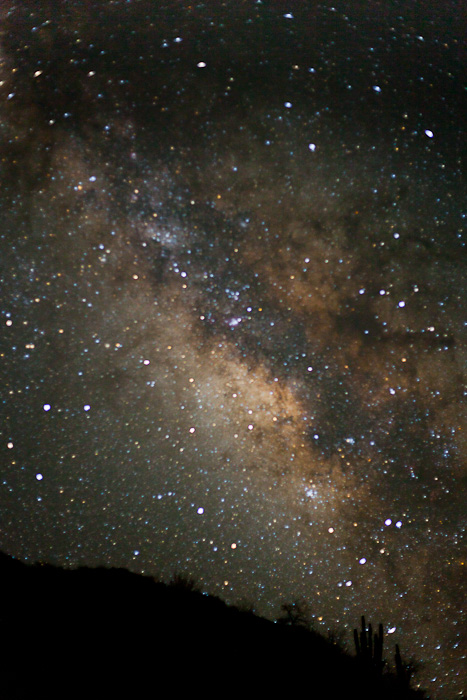
Last April in Baja I didn’t get it right photographing the heart of the Milky Way, located near the constellation Sagittarius. Baja is great dark sky country—dry and clear, with little light pollution. Through research I discovered Sagittarius would be in the SSE night sky in the morning just before dawn. I rose in darkness after a clear night, and sure enough, there it was, brilliant against a dark hillside in a Sea of Cortez sky. I shot a few frames—only to find out later I underexposed them and blew the focus.
This tip covers how to find the heart of the Milky Way from our northern latitudes—especially 35-50° N—and then get the shot with a single exposure. Call it Milky Way Photography 101. Our goal is to lay the groundwork for creating an outstanding image of our galaxy’s heart on the first go.
The Milky Way stretches across a dark sky on many nights. In the northern hemisphere, if we look south at the right time and date, we’re peering into millions of our galaxy’s stars. The star-clogged center is just above Sagittarius.
From Earth’s perspective, the stars (our sun and the planets excepted) can be thought of as a fixed, distant, immobile sphere—the ancients called it the celestial sphere. But because the earth rotates, the stars on the sphere appear to rotate as well, moving from east to west across the sky, except at the poles. Our north star, Polaris, appears fixed. If we face north, the other stars rotate counter-clockwise around it. If we face south, we can’t see the other pole star(s)—the Southern Cross—but the southern sky non-the-less rotates around it, clockwise (east to west) now because we’ve turned around.
For locating stars, it’s useful to project our equator outward onto the celestial sphere. When we do, we find the constellation Sagittarius is south of the equatorial projection, in the southern hemisphere. Sagittarius rotates clockwise around the Southern Cross, just like our Big Dipper rotates counter-clockwise around Polaris. But Sagittarius rotates around an object we can’t see, and hence spends more hours below the horizon each day than it spends above.
So again, Sagittarius rises and sets daily. In the northern mid-latitudes, it’s fairly low on the horizon, if it’s visible at all. The next question, then, is when can we see it? Very useful for us is the date Sagittarius reaches its nighttime apex at midnight. We call this crossing the Meridian—sort of like high noon in June for our sun. The date Sagittarius crosses the Meridian at midnight is about July 7 every year (or 1am considering daylight saving time).
Contrarily, about January 5, the sun directly blocks our view; don’t look for Sagittarius in winter.
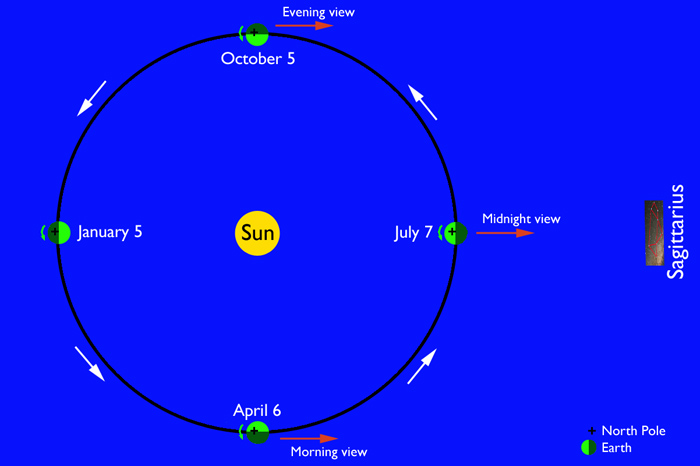
The shoulder months make things interesting. As the earth moves around the sun, the stars rise four minutes earlier each day, or about two hours earlier each month. On April 6, at 5 am (standard time) Sagittarius is in the SSE just before sunrise. A useful axiom is that the constellations we see in the morning will show in the evening four months later. The Milky Way heart on a pre-dawn May morning will show in the evening in September. In October, Sagittarius can be seen just after sunset in the SSW sky.
Lucky for us in the northern hemisphere, on warm summer evenings we can stay up all night and see the glorious heart of the Milky Way rise and set in darkness. To find Sagittarius, look south. A few of the constellations brightest stars form a shape called the “teapot” (see mouseover in above image). Find this and you’re looking at the heart of the Milky Way.
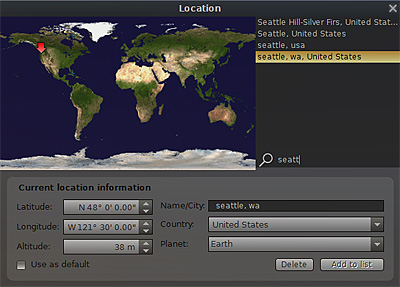
To plan your next dark night shoot, download the app at www.stellarium.org. After downloading the software, hit F6 to bring up the location window, and click on the world map at your desired location. Fast forward to the date you want to observe with the arrow keys, and view just what you’ll see in the southern horizon—or anywhere else—at the time and date of your choice. Wow!
Once you know when to photograph and where astronomically, you also need to know where geographically. Consult a dark sky map. In Washington State, Table Mountain near Ellensburg is locally famous for the Table Mountain Star Party, but for an outstanding shot I suggest finding your own foreground, because composition is key. The Sunrise area at Mt. Rainier has a lot of potential. Or head for eastern Oregon. You need a clear night, obviously.
As with any serious photography, it’s good to scout your specific location beforehand. On a dark night it’s difficult to see your composition. Know where in the sky the Milky Way will appear so you can juggle a silhouette or, with a bit of moonlight, a dimly-lit foreground.
Guidelines for Single Exposure of the Milky Way
Camera: Select a camera with low noise. A Canon 5D II is a better choice than a 7D.
Lens: Use a big aperture, wide-angle lens. A 24mm f/1.4, 35mm f/1.4 or a 16-35mm f/2.8 are great. A 50mm f/1.8 is a low-cost option. One great difficulty is seeing the dark sky through the viewfinder and every bit of speed helps for composing and for focusing. Then when you take the shot, the fast lens will gather more light before hitting the 600 rule limit.

600 rule: To find the shutter speed that adequately freezes moving stars, divide 600 by the focal length of the lens. If you have a cropped sensor, divide again by the crop factor (1.3 or 1.6 for Canon). For example, a 24mm lens: full-frame sensor, 600/24 = 25 seconds; cropped sensor, 600/24/1.6 = 15.6 seconds. Shooting slower to gather more light will result in star trails.
Focus: If your camera has live view, manually focus at 10x on a distant star. Alternately, mark your lens at its infinity focus before you get out in the field. You’re not likely to have a bright enough distant object for auto-focus.
ISO: Use 1600, 3200, maybe even 6400.
Image format: RAW
Exposure: At 1600 ISO and 25 seconds (24mm f/1.4 lens), try an aperture of f/2. If your 24mm is an f/2.8 lens, shoot wide open and boost the ISO to 3200.
Noise Reduction: Turn ON. For a single exposure, you’ll definitely want this ON if you have it. In-camera long-exposure noise reduction takes a second exposure of equal time with the shutter closed, and then subtracts the result from the original, a huge benefit in reducing noise.
Image stabilization: Turn OFF.
Mirror lock: Not necessary with these long shutter speeds. Vibration is usually damped in a fraction of a second. If your habit is like mine, though—mirror lock w/2 sec time delay—use it anyway since it’s part of your routine.
Cable release (ie. Canon TC-80N3 or Nikon MC-36): For shooting under 30 seconds, you generally don’t need a cable release. You may, however, want to do a long bulb exposure at a lower ISO to expose the foreground, to combine later in Photoshop.
Battery: Save the fresh ones for star trails. You don’t need a full charge for 10-30 second exposures.
Headlamp: A red lamp is a big plus for seeing in the dark without ruining your night vision, and a red light is mandatory if you’re out with a large star-gazing group. Pick up a Petzl Tikka XP or a Mammut s-flex.
Composition: Makes or breaks the image, so compose carefully. Live view may help, but if you use it to compose, turn it off before you make your images.
Tripod: Mount camera on a sturdy tripod.
Gary
Gary, great article! I had a question you might be able to answer for me. I’ve had good luck with Milky Way shots using 24mm f/2.8 at 25 to 30 seconds (full frame & iso around 1600). I also have a 16mm f/4 lens, which would allow me up to 37 to 40 seconds based on the 600 rule. My question is, which might do better; larger aperture or longer exposure?
Regards, David
David
I’d give the nod to the 24mm f/2.8. But use the lens that best fits your need. I like the 24mm field-of-view for Milky Way shots, but the 16mm shows more sky by definition, and that could be of value. Also, since foreground elements add to the composition, oftentimes a tree silhouette, for example, is easier to use as a frame with 16mm and still be in sharp focus.
Good luck,
Gary