Since going to a digital SLR in ’05, I’ve always shot RAW. Shooting jpg was for hobbyists—or so I thought.
For the unfamiliar, RAW is a generic term for unprocessed image data straight from the camera. The formats are proprietary, with extensions like CR2 for Canon or NEF for Nikon. With RAW, all the image information of the original capture is retained, including especially lights and darks not visible while looking at a minimally-processed image rendered from the file.
Jpg, in contrast, is a standardized format. A jpg image is created from the RAW data in-camera—based on automatic or user-set white balance, sharpness, color saturation, etc. The settings are “baked in”, the file is compressed, and the RAW data discarded. Jpgs save a good deal of disk space and processing time. My Canon 5D, for example, gets about 240 RAW files, but over 600 jpgs, on a 4GB card. And jpgs are ubiquitous. Digital images generally—especially on the web—are jpgs.
RAW files are a sort of digital negative. The “hidden” information can be revealed or enhanced via digital darkroom “recipes” in software like Adobe Lightroom, Apple Aperture or the camera manufacturer’s convertor. RAW is particularly useful to recover from a bad exposure, or to better deal with high contrast light. A couple of examples illustrate, with images plucked from Lightroom 2 screen captures.
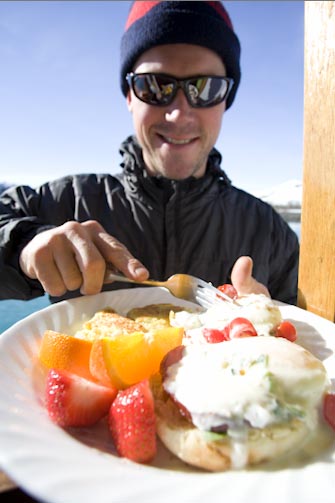
The food image aboard the kayak mothership Home Shore was photographed in RAW plus jpg, a tough (and incorrect) exposure with large areas of blown whites in the jpg. In the first image, if you run the mouse over the “blown whites” tab of the jpg, you’ll reveal red areas that indicate the blown highlights. This loss is mostly unrecoverable from the jpg file.
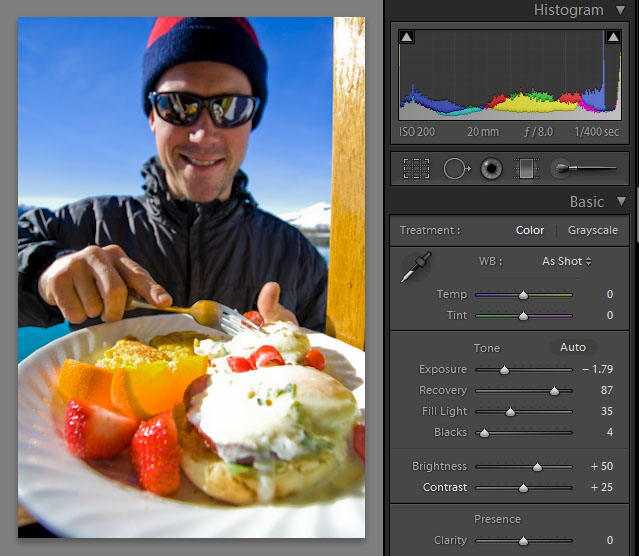
I used Lightroom 2 exclusively for the recovery and optimization, using global adjustments—that is, adjustments applied to the whole image. In the resultant (second) image, the jpg image shows improvements, but with no information in the whites of the sauce the area remains blown. Note that I dropped the exposure for the jpg to -1.79, recovery to 87, and the histogram still shows pegged whites (right side of graph). From the RAW file, I dropped the exposure to -1.05, recovery to 7 (mouseover From RAW). I still have a bit of pegged whites, but this is from the specular reflection in the upper right wood, not the sauce. Detail in the sauce comes through, and the histogram from the RAW file shows an even distribution of tones.
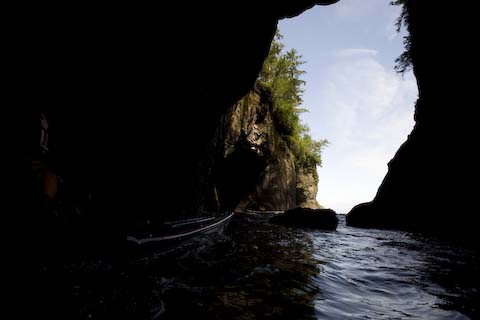
The second image was shot in a sea cave, exposed for sunlight, leaving the dark areas of the cave to fall to black. Again shooting RAW plus jpg, the original jpg file has huge black areas. Processing both RAW and jpg, I found it useful to fully push up the luminosity sliders of the reds (ie making the reds selectively brighter), very helpful for the RAW file because there was red in the dark areas of the kayak. In the jpg, these red areas had mostly been baked to black. Looking at the 100% detail by mousing over the tabs, there’s enough information rescued from the RAW for me to have a usable image; in the jpg, the kayak and kayaker are difficult to discern, with huge areas lost to black.
Whether you shoot jpg or RAW is up to you. Getting quality images from tough exposures favors RAW. If you make prints, the tonal range of RAW can be an advantage, with less risk of banding, though the highest quality jpgs make great prints in most instances. For many—if not most—purposes, jpg has advantages. You won’t be stopped dead by the camera’s buffer while shooting sport or wildlife action. In the field especially, time is money, and processing jpgs is quicker in the field. It’s faster for turning over the nephews game shots, or for a quick upload to a newspaper. And if your running low on flash memory, jpg can save the day. Jpg demands accuracy in exposure, though. You better get it right.
Some photographers shoot RAW plus jpg. Although I’ve been doing this for test shots, in general this makes little sense to me. You can always derive the best possible jpg from RAW. If you’re taking the time to shoot and store RAW files, learn your editing software well enough to make editing and developing the RAW images routine. Then export only your best to jpgs for sharing.
Thanks to Home Shore kayak guide Benson Isley for posing for the first image.
Gary