Edited 3/15/2013. Once a month I attend a local Audubon bird photography meeting, held at the local Unitarian Church in Kirkland. We bring in digital images on flash drives for show and tell, discuss field trips, and teach each other tips and techniques. This tip grew out a recent meeting. A bunch of us use Adobe Lightroom 2 to manage images. Before Lightroom, it took me an hour or more to find and prepare images for the meeting. With a functioning Lighroom Library and some specific Lightroom 2 tools, the timeframe now is more like 10 minutes.
For the relatively simple task of creating photos to share, or assembling images for submissions, using Lightroom is very efficient. To get to that point required some real deliberation about how to store digital images—about setting up folder, retrieval and archiving structures that work. Serious photographers need to address this task, as well as establish a workflow routine.
Just to review (see FAQ for more), after a shoot I import the fresh images into year-month-day folders in Lightroom, followed by several editing (discarding) pass-throughs. I then keyword, re-name, and archive. The orderly entry sets the stage for efficient use of the database in which collections are key. In the old film days or early digital days, we did painstaking searches through folders, creating evermore folders with dupes or with digital derivatives of files that bloated hard drives. Those days are (or should be) gone. Collections are virtual assemblages of images. With collections, an image can be efficiently pulled from any available folder—to multiple collections if that’s your need—without physically moving or copying that image.
Our monthly meetings, being predictable, can make image selection fast. My goal each month is to show a dozen or so of my recent, and best, bird imagery. Let’s pick apart that sentence. The words translate well into the logic of an image search. Recent, best and bird filter by metadata (capture date), attribute (star-rating) and keyword (bird).
One way to collect images would be to use Lightroom’s filtering and Quick Collection. Because this is going to be a repetitive task, though, it makes sense to pursue a more permanent solution. By using Lightroom 2 Smart Collections, I’ve created a best-birds collection that shifts each month according to my filter criteria. So before heading to the meeting, I click on this collection, select a dozen or so photos, and then export them to a flash drive. I’m ready for the meeting in minutes.
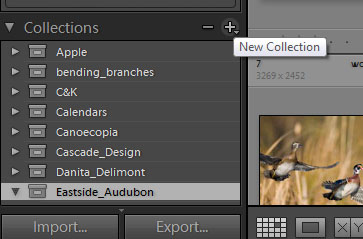
To set this up yourself, open Lightroom and scroll down the left panel to the Collections heading. The first thing to do is create a Collection Set. Think of this as a container, a virtual folder, in which to put related Collections—in this case collections related to the bird photo meetings. Hit the +sign, choose Collection Set. In my case, I type in Eastside_Audubon, the name of our club. Hit Create and the Set appears in the Collections column. Click on this new Set, and then hit the + sign in the Collection header and choose Smart Collections from the pop-up menu. A new pop-up with the heading Create Smart Collections appears. For name, I chose Monthly_Bird_Photos. The Set should read (for me) “Eastside_Audubon” by default because I clicked on that set beforehand. I left Match to all.
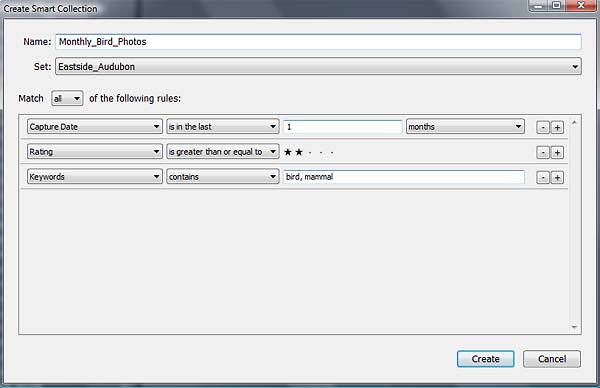
I changed the first criterion, Rating, to Capture Date; “is” to “is in the last”; leave “1” the same; and change “days” to “months”. So now I’ve matched my first criterion: “Capture Date is in the last 1 months”. I hit the plus sign at the end of the line to add another. This one is for the default—Rating—and I chose “is equal to or greater than” and click on the second dot (for two stars). For the third criterion, I hit the +sign again, and change Rating to Keywords from the pop-up. “Contains” shows up by default, just what I want, and I type “bird” and “mammal” in the box. I add “mammal” because I sometimes show mammals as well as birds at the meeting, and I don’t want to miss that opportunity. I now have a Smart Collection contained in the set Eastside_Audubon called Monthly_Bird_Photos. Inside it are virtual copies of images that roll with the month, and from which I can quickly choose photos for each meeting.
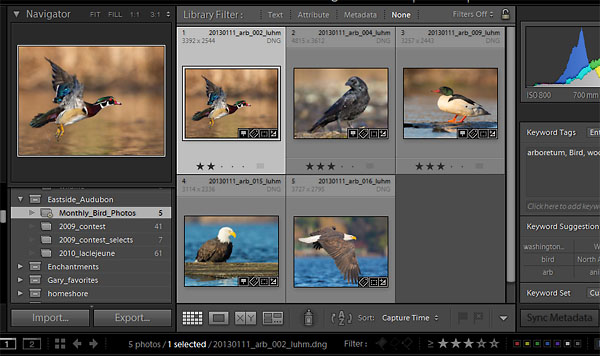
To choose the images for the meeting, I click on the Monthly_Bird_Photos collection, and chose images by holding down the Ctrl key. When I’ve selected a dozen or so, I hit the Export button, chose a Slide Show preset in the Export pop-up menu (My Slide Show preset sets the images to 1024×768 pixels, quality 80 jpg and puts the images into the thumb drive folder named Gary. All that remains to do is hit Export.Gary