I’ve photographed birds with a 500mm f/4 from kayaks since 2003, when I mustered the courage to risk the big, expensive glass for the task. Since then I’ve used the same set-up in a dozen or so different kayaks—kayaks from my own fleet, outfitter kayaks and rentals. All of these were closed-deck boats, which offer a foredeck on which to rest the lens and get low. I support the big lens on a padded deck bag, instead of putting the lens tripod mount in the palm of my hand, or resting it directly on the deck. While paddling between shots, the camera w/lens stows in a waterproof drybag inside the cockpit and out of the way between my legs. I use a sprayskirt to shed water while underway. The best kayak choice for bird photography allows you to safely use a big lens by having a cockpit big enough to avoid entrapment. You need to be able to extract yourself—even if panicked—in a worst-case-scenario capsize. Kayakers occasionally capsize while getting in and out of their kayak. Once seated and underway, capsize isn’t likely unless the wind blows up a big sea that’s beyond one’s ability, but that’s a separate issue in which judgment and experience play a big role. It is possible to flip on flat water. For example, if you’re paddling at speed and collide with a hidden, submerged log at an improbably wrong angle. Or lunge for a lens cap that you’re about to lose over the side. You get the idea.
I prefer a kayak to a canoe because in addition to the low angle, a kayak can handle more varied conditions. Kayaks are faster and have less windage. A canoe can carry bulkier gear, they’re generally more stable if on flat water and entrapment isn’t a worry in a capsize.
Photographers would do well to choose a kayak for the kind of paddling they intend to do: a kayak that gets you a stunning mountain lake location, as well as serve as a bird photography platform.
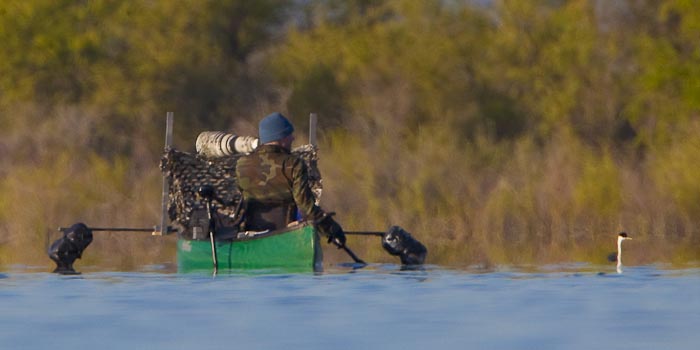
Above is an example of a photographer’s set-up that I would discourage. One problem is the time it takes to assemble all the kit on the canoe. The outriggers aid stability, but once assembled you can only move and turn slowly. Then for comfortable shooting, the tripod puts the camera 30-36” off the water. The higher you go, the more unstable it becomes—perhaps necessitating the outriggers. Shooting closer to the bird’s eye level is preferable. From the foredeck of a kayak, you’re 15-18” above the waterline. Additionally, even small wave action will disrupt shooting from a tripod in a canoe.
I shot for a couple weeks from a borrowed, camouflage-painted kayak and paddle many years ago. My conclusion: the camo made no difference, though a plain paddle color (not white) was useful. Unless you’ve concealed yourself like a muskrat house (not a bad idea), you’re not going to fool sharp-eyed birds. And so it is with this canoe set-up—the birds see it coming, and move away as the photographer approaches. Poor mobility means you lose even more shots as the birds slide on by.

The boat I’m using for bird photography now is a Necky Manitou 14, a short sea kayak (14’-4” long, 24½” beam, 44 lb. listed weight) with a closed foredeck (Note: I acquired this kayak from Necky in a trade for photos, so I’m not unbiased). Bulkheads isolate bow and stern compartments that are accessed through hatches. The kayak is long enough to paddle at a 4-knot pace if you need to get somewhere, and, in my view, plenty wide for stability while photographing with a super-telephoto lens. The cockpit is big enough to stow, between your legs, a 500mm f/4 lens with tele-extender attached to the camera in an unpadded,

waterproof bag (I use Sagebrush Dry). You do need to wear paddling shoes and not boots, though a waterproof mukluk-type like a Kokatat Nomad works fine if you want to wade into the water for launching and landing and still keep your feet dry. The boat is equipped with a skeg—a drop-down blade controlled by a lever alongside the cockpit. Skegs function to control kayak direction, especially to keep you on course in wind. I find them very useful, preferable to a rudder for that purpose, and especially useful to keep me in line when I drop the paddle to photograph.

The hatch openings for the Manitou 14 are a nice oval (15¼”x 8” bow, 15¼”x 11½ stern), good for sliding in long, slender stuff. I can fit my big G340 Gitzo in the bow if I remove the ball head. Volume in the bow is 13 gallons (49.2 liters); stern, 18 gal (68.1 l); not huge, but that’s 7,233 in3—about double a typical (multi-day) backpack. For over-night or extended trips, loading through the hatches is easy. The cockpit volume is quite large at about 50 gallons. This disproportionate volume (compared to longer, skinnier kayaks anyway) in the cockpit flags it as the sort of short sea kayak that a bird photographer should consider.
All kayak choice is a compromise. This one excels as a bird photography boat, while giving you the options for short overnight trips, paddle days of ten or more miles, and decent control in windy conditions. The bright color of the boat (my choice, of course) may be seen as a negative for photographing birds, but it photographs well (kayak photos sell) and, for safety, is easily seen by other boaters.
For tips on packing, see my 02/08 tip, Packing a Small Sea Kayak.
Gary