A throw-away image rises to four-stars.
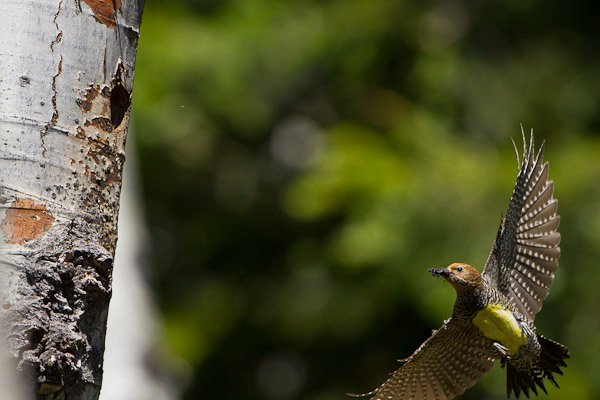
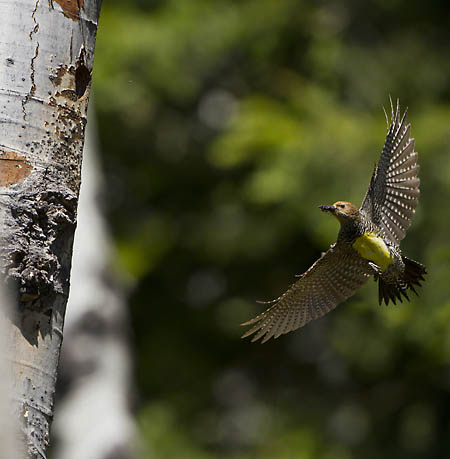
I was in Eastern Washington last week at a Williamson’s Sapsucker nest site. They’re interesting birds, and unlike other woodpeckers, the male and female look completely different. The male is a black and white typical of woodpeckers, but the female is brown with spectacular white barring on the wings. Both have a yellow belly and a white rump patch. After studying the comings and goings from the nest hole, I decided to set up to capture flight shots as the birds approached and left the nest.Setting up for shots like this is all about tradeoffs. As always, I wanted a blurred, pleasing background. I also wanted a bird reasonably big in the frame. Of course, big-in-frame means shallow depth-of-field, and the likelihood of many out-of-focus images. It also means cut-off wings or other bird parts due to the narrow field-of-view. I could step back to make a flight shot easier, but the bird would be smaller in the frame, and then I’d unhappily be forced to crop the resulting image. Just as bad, stepping back would bring background distractions more in focus—in this case a ruinous mess of aspen and conifer branches in a mix of deep shade and full sun.
To capture a smidgen of depth-of-field—with a decently fast shutter speed—I set the exposure manually on my Canon 7D and 500mm f/4 to an aperture of f/6.3, a speed of 1/2500s, and an ISO of 640. I balanced the lens foot on a tripod, shut off the IS (image stabilization) and focused manually on the hole opening. I also plugged in a remote cable release (Canon TC-80N3) both to reduce vibration from tripping the shutter and to allow me to view the whole scene because now I didn’t need to look through the viewfinder. By using the remote I could see the bird’s arrival, and time the tripping of the shutter to get off a shot or two before the bird landed at the nest. Regardless, my sharp image rate was abysmal, and I chopped plenty of wings.
On returning home I decided to try salvaging a lovely but clipped wingspread of the female Williamson’s. I found another photo with a reasonably close wing shape—and a decent color match—that stood a good chance of making a believable repair.
Importantly, while in the field I had made a few bird-less image captures framed above and below the set-up shots at the nest, in case I needed them to expand the canvas for making verticals. And I did need them. Not only did they save the day for the wing repair, but they allowed me to create a vertical from the horizontal capture.
I’ll mostly just describe here the clipped wing repair, but my final result is a 24 megapixel vertical from my 18 MP Canon 7D.
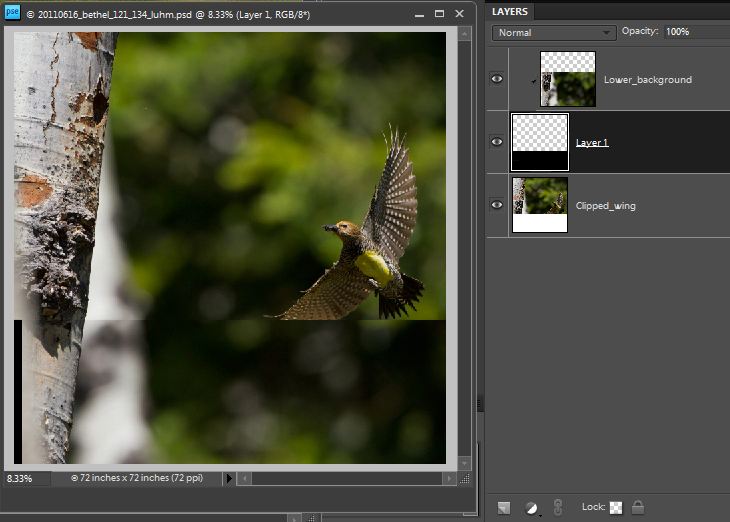
On the computer, my first steps, as always, were in Adobe Lightroom 3, where I selected the images I would need to complete the task. First I optimized the shot of the bird with the cut-off wing. This image is the main subject, so it needed to be right. I then synchronized the other images to match. It was helpful, if not imperative, that I had shot RAW and in manual (same settings throughout) to make all this easy for later blending. In sum, I needed three images: the clipped wing, the repair (clone) wing, and a background shot with a lower aspen trunk to expand the canvas.
In Photoshop Elements 8, I open my clipped wing image and expand the canvas below. I then bring in the background shot (drag from the layer panel while holding down the shift key), reduce its opacity to 50% to make it temporarily transparent, and move (Move tool) it until the overlapping aspen trunks line up. So far, looks good.
To blend the images, I need a separate adjustment layer, one that paints to reveal, and erases to hide, without being destructive to the image layers. In Elements 8, adding adjustment layers can be done by clicking on the “Create a new layer” icon at the bottom of the LAYERS panel. First I click on the clipped wing layer, and then click the “Create new layer” icon. A new layer appears between the other two. I then click on the topmost (Lower_background) layer, and here’s a trick. I hit CNTL-G. This links the selected layer to the new (adjustment) layer beneath it. Because that layer is blank, the Lower_background layer disappears (note: this linking can be done more efficiently now in Elements 9, which links adjustment and image layers together like in Photoshop CS. Elements 8 doesn’t have that capability, hence the trick). Using the brush tool from the left toolbox, I paint in the background after selecting the area I want painted with the magic wand. I also re-name the layers.
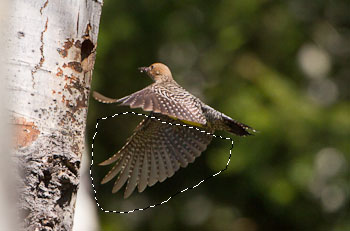
Before I do any further background painting, I want to be sure the more difficult wing clone will be believable, so I’ll go to work on that next.
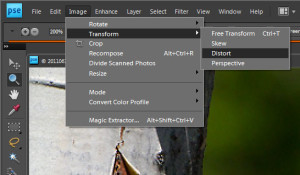
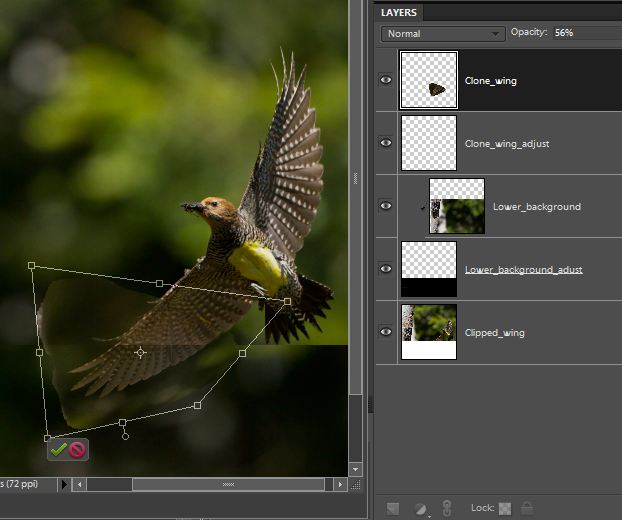
I open the wing clone source image, select a coarse circle around the wing with the Lasso tool, click the Move tool, drag the selection into my working image, and re-name the layer “Clone_wing”. After reducing the opacity, I then move the clone wing on top of the clipped wing, rotate it a bit, and discover it’s far too wide. Re-sizing won’t fix that, because then the clone wing will be too short. What I need is to distort the new wing so the two wing pieces match both in length and in width. The Distort tool is the tool I need, though Skew will work as well. These tools are found in the top menu under Image. I may also use Free Transform for rotating and sizing, but Distort can do everything (It just can’t rotate and re-size efficiently). I chose the Distort tool from the Image menu and play around with the corners until I get a good fit. It takes a couple of iterations of Distort and Move, and the wing fits into place. I’m pleased as well. The exercise appears to be worth the time and effort.
I next need to blend in the clone wing, and then finish the blending of the background.
I click on the Lower_background layer, click the “Create new layer” icon to create the adjustment layer, and name it Clone_wing_adjust. Then I click the Clone_wing layer, and click CNTL-G. Once again, the linked layer disappears because nothing is painted on the adjustment layer. Then it’s just a matter of painting and erasing within the Clone_wing_adjust layer to get just the right amount of wing to appear. I use some selection tools to refine it along the way, and feather the selections by 1 or 2 pixels.
When I’m done I have a believable new wing, so I proceeded with blending the background layer, painting in more of it to smoothly mesh backgrounds with the Clipped_wing layer.
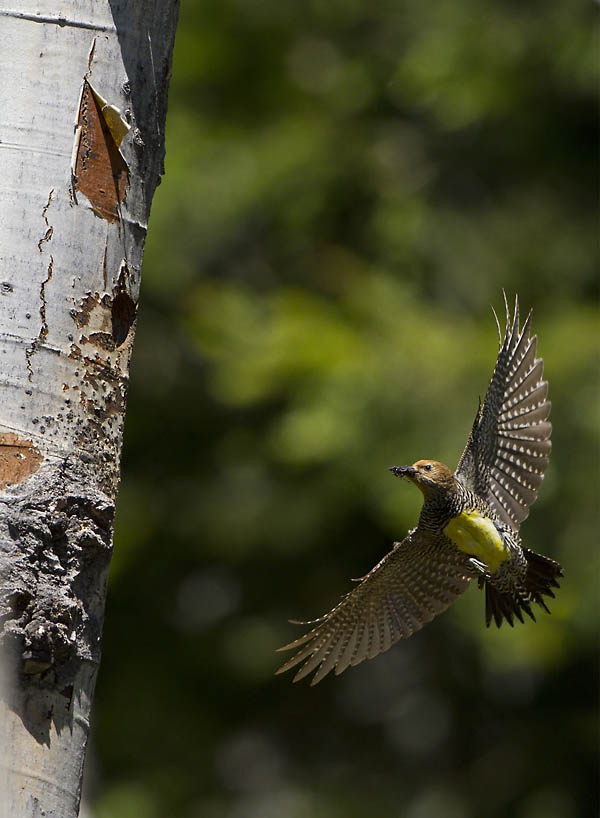
Task complete, I’d normally be done, but I don’t like the bright, out-of-focus aspen in the background. I’d also like the bird closer to the hole, and I think making a vertical by adding canvas and background above the hole will make a more marketable result. I’ve come this far, can I bump a three-star image to four stars?
Skipping the details, the additional work goes quickly. The result is a high-megapixel shot suitable for a poster or magazine cover. I also feel I’ve created a select image that makes the whole shoot in the field worthwhile.
Gary