Focus stacking is a relatively new digital imaging technique, especially useful for macro and scientific photography, and an occasional aid for landscapes and small portraits as well. It’s a clever digital answer to lens optic limits that conspire to demolish resolution and depth-of-field (DOF). Image resolution falls precipitously at high f-stops (f/22 and smaller). Depth-of-field gets paper thin in high-magnification macro photography. Focus stacking software selects the sharpest areas from multiple frames to overcome these limitations. Focus stacking is useful for extreme DOF landscapes, and, contrarily, for floral portraits where increasing the depth-of field by stopping down destroys “bokeh”—that lovely, out-of-focus (OOF) background that makes a portrait sing.
Focus stacking is achieved by creating a series of images at a relatively large aperture, with the focus for each image moving progressively through the subject. The series is then stacked in software that selects the sharpest areas of each image and then flattens them into one. Stacking demands use of a tripod, although stacking software will align the images if they’re reasonably close. A focusing rail is recommended for macro.
Available software includes Adobe Photoshop CS4/CS5, Zerene Stacker, Helicon Focus and freeware CombineZP. My only experience is with CombineZP. Although the two examples that follow are of floral portraits, focus stacking has great utility for macro and landscape photography.
Focus Stacking: Example 1
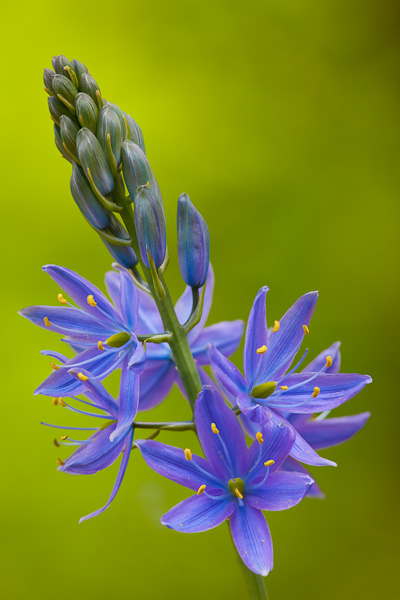
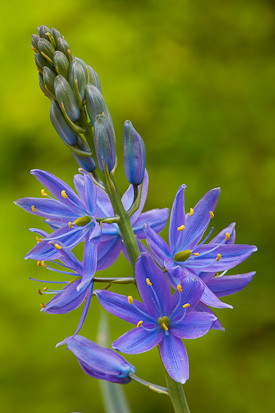
A primitive (slow but effective) processing method for focus stacking is to do it manually, say in Photoshop using layers. A manual method is useful for control—especially background control—of simple image sets. The Camas image (right) is a single image example of a busy background caused by stopping down. Shooting at f/16 renders the entire bunch of flowers sharp, but ruins the pleasing OOF background. To combat this, I instead created two images, one focused on the stem and the other on the foreground anthers, both at f/5.6. The narrow DOF creates a lovely, extremely OOF background in both images. In Photoshop Elements 8, I stacked the two images in layers. I then used an adjustment layer to paint in the sharp anthers and foreground pedal tips of the near focus image onto the one focused on the stem (If you’re unfamiliar with the technique of painting and erasing using adjustment layers, see Floral Portrait Conundrum). I could have used a third image to paint in the flowers behind the stem (they are a bit OOF), but that’s an artistic choice (note that I also cloned out a lower, unopened flower). In any case, a far stronger image results from the combined images because the distraction of an f/16 or f/22, high-DOF background is avoided (see upper left).
Focus Stacking: Example 2
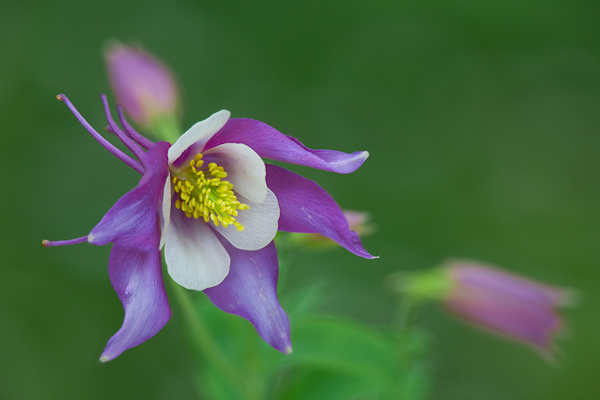
The second flower portrait is more difficult because the flower is closer to the camera, has more depth, and the background is closer behind. I again tried manual methods, and this time I needed five progressively-focused images, which I placed in Photoshop one on top the other. Adjustment layers were put in between. It took an hour to paint in the sharpest areas of each image to my liking—way too much work. I then turned to CombineZP for an alternate solution. After installing the software, I opened the program, clicked NEW, selected the Columbine images, and selected ALL from the pulldown menu. That’s it.
The CombineZP program cranked through the five images and in a few minutes delivered an astonishingly perfect flower, completely in focus. The program isn’t perfect. There were some odd artifacts in OOF areas, which I’ve found can get extensive in some image sets. Also added were “mirrored” artifacts that increased the dimensions of the result, but a simple crop corrects that for the final image. Additionally, because the program selects the sharpest background, for floral portraits the program selects a background that is the least preferable. For portraits, an additional manual step that replaces the background may be warranted.
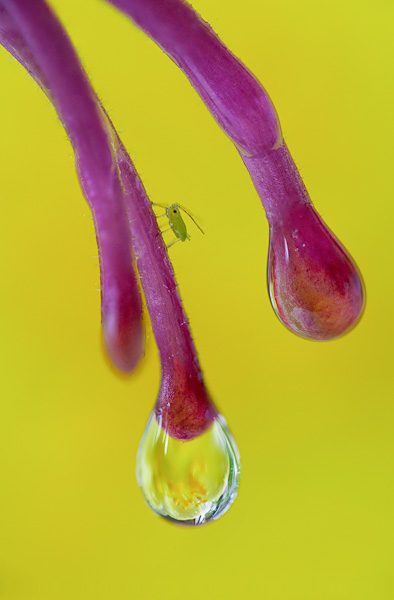
At left I’ve included a macro example, a CombineZP image of a flower focused in a raindrop. Again, great results, and in this case it’s something I’d never attempt manually. Apart from rendering pleasing backgrounds of sharp subjects, focus stacking can benefit landscapes by improving on the loss of sharpness caused by diffraction. An f/22 image is noticeable less sharp than an image created at a “sweet spot” f/8 or f/11, demonstrable at 1:1 magnifications. I made no attempt here to parallel the plane made by the aphid and the two dew drops. Nonetheless, they’re all in sharp focus, with no apparent artifacts. An 90mm lens with reversed 50mm achieves approx. 2:1 magnification. Canon 5D II, TS-E 90mm f/2.8@f/8 w/rev. 50mm f/1.8, 1/10 sec, iso400.
Focus stacking a landscape set allows for sharper overall rendering, and concomitantly, potentially far greater DOF compared to f/22. In this, focus stacking can compete favorably with the tilt feature of tilt/shift lenses (see Tilt and Telephoto). A tilt lens is likely to be preferable for a field full of flowers. Focus stacking would be the choice if, for example, the image uses an arching, foreground tree to frame a more-distant subject. Of course, there is also the tradeoff of field time vs. computer time, and then there’s the cost (and weight if backpacking) of the tilt/shift lenses, which are both pricy and glass-heavy.
Focus stacking is an exciting digital tool. I hope to find creative uses for it for portraits, for extreme DOF landscapes and for macro.
Gary