
Photographers carry a lot of photo gear, so a big-volume sea kayak logically meets the need. A long, large kayak can be fast as well, but can also be a heavy lift solo, and a bear wrestle in wind or in surf. Most photographers aren’t burly-burly men. They just want a kayak to get them to a photo-op. So what about small? A small sea kayak has less windage, is an easier solo carry and generally turns and surfs well.For packing, I assume here that a fresh water source is never more than a day or two away, similar to conditions in the Pacific Northwest. And to make it interesting, I’ll pack my big telephoto lens (500mm f/4), wide-angle and short-telephoto zooms, tripod and other camera accessories—the same load of camera gear I’d select with a bigger boat.
The small kayak I’m packing is a composite Necky Eliza, 15’-3” lg, 21” beam, 42 lbs, with a low deck profile, skeg control, two bulkheads and volume about 10.4 ft3. The two hatch openings (no day hatch) are sealed with 16”x9” VCP hatches—ample in size and great for sliding in long, slender stuff. Volume in the bow is 16 gallons (60.5 liters); stern, 20 gal (75.7 l). For you backpackers, that’s 36 gallons— 8,400 in3—and that’s not counting cockpit (42 gal) and deck space. The short kayak length, hatch size and hatch location make loading easy, provided you get your gear volume packaged to fit. I have to work around the skeg box in the stern, but I prefer a skeg to a rudder, and I can easily reach behind it through the hatch. I also find I can put a 32oz Nalgene bottle (used to stow a repair kit or other items) all the way up in the bow or stern and still retrieve it, without attaching a string for recovery. A small boat, I’m finding, has more than a few advantages.
A general packing strategy for sea kayaks goes like this:
- put the heaviest items centered behind the cockpit
- keep heavy stuff low
- distribute the weight 40% forward and 60% aft
- pack everything you don’t want wet in a dry bag
- keep the deck clean
Also, pack items you’ll want at a rest stop (like a thermos w/hot water) accessible. Gear needed while underway, like an emergency kit, should be on your person in PFD pockets and bail-out pack. I also put a fleece hat, rain hat and snacks in a deck bag. On the cold ocean I wear a (Goretex) drysuit, so I don’t need access to other clothing on breaks ashore. On an open coast paddle, I’ll have a spare paddle, chart case, small deck bag and helmet secured on deck. A day-use camera bag and water bottle sit in the cockpit below deck.
A small boat dictates small dry bags, crammed—with a plan— into the available space. My dry bags are a mix from various manufacturers. For packing small I love the new silnyl fabric bags, from Sea-to-Summit or Outdoor Research. The slippery material means I can stuff clothing or sleeping bag in tight, and use a knee to squish out the air. They typically have a thin buckle with thin webbing, which rolls up tight and small. When closed, a silnyl bag looks like it’s been vacuum sealed, and can even be shaped a bit if you need to cram it in a corner. Contrast that with vinyl dry bags, with their bigger buckles and less flexible skin. The heavy vinyl is much more durable, but in a test my sleeping bag packed in vinyl to a 28% bigger volume compared to silnyl. I like the vinyl see-through bags, but for packing small, silnyl wins.

I also have five home-made bags, made from heat sealable fabric from Seattle Fabrics. They’re simple to make, although you need a good sewing machine (and an iron). Each bag meets a specific need: small tripod, big tripod, book, pointy and chart. Seattle Fabrics has a how-to article (SeaKayaker, June, 02; Spring, 90) that they’ll include with a sale if you ask.
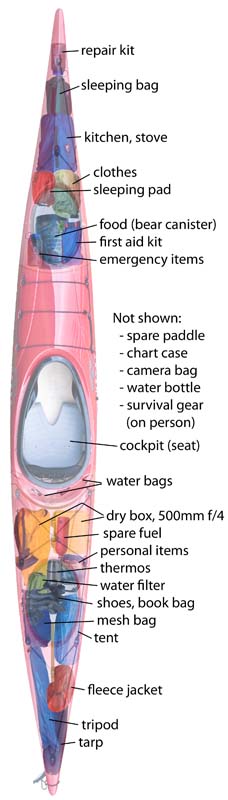
I load the boat like in the diagram, preferentially putting light gear up front. However, I decide to use a bear canister (Bear Vault BV400) for food (For an Olympic National Park coastal trip, canisters are required, not so much for bear but for raccoons). A week’s worth of food weighs in at 15-20 lbs, and the canister (8.7” dia and 12.7” lg) only fits in the bow. The stern’s too shallow, and the canister’s also too big for the cockpit—but that’s a bad location in any case. I put the kitchen and stove up front, more fairly heavy items, but my camera gear—destined for the stern—is even heavier. The sleeping bag, clothes and sleeping pad are in separate small and light silnyl bags. A few other incidentals fill nooks in the bow.
In the cockpit behind the seat, I have space for about two gallons of water. I like the 4-liter Platypus Watertank (or MSR Dromedary) bags, but re-used, rinsed-out wine bags can work too.
Stern packing is complicated because it’s shallow, and is split by the skeg box. My 12’x12’ tarp (in my opinion mandatory), rolls up thin and is flexible, so that bag goes in first, slithering all the way in. Then from the other side of the skeg box I slip in a light carbon fiber tripod, legs first and in its own bag. It slides in almost as deep as the tarp. I put another silnyl bag, housing a compressed fleece jacket, in next. It fits nicely behind the skeg. A two-person tent squeezes in aside the skeg box, and opposite the tripod.
Toward the cockpit end goes the heavy camera gear: my 500mm f/4 in its own zippered dry bag (Sagebrush Dry Goods), and a small but heavy Pelican box crammed with alternate lens, filters and digital accessories. In the remaining space I put sandals or hiking boots, a see-through bag with personal items, thermos, a chart and book bag and a water-filter bag. I may need to filter water during the day, so I want that accessible without digging. Finally, I stuff in an empty mesh bag (might contain spare line or gas bottle, etc). I use it as an organizing and carry bag.
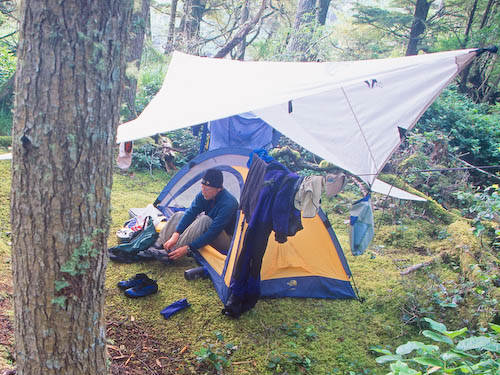
After paddling ashore at a camp spot, I open the rear hatch, and fill the mesh bag with the tarp, tent and as many other items as will fit. In the Northwest, the tarp goes up first, creating a protected space for gear and to pitch a tent underneath. I set up camp wearing my drysuit. By the time I change out of it, the perspiration from paddling has usually evaporated, and I’m ready to swap it for fleece (or rain gear) and explore (and photograph) the landscape.
One last point. I weigh 165 lbs, at the high end for a boat this size. A 200 lb paddler might like the Eliza (unloaded) as a playboat, but laden with so much gear, he’ll need a periscope for navigation.
Gary