A year ago I built a light-weight panorama tool out of wood. My hope was to make back-country panoramas. My dream was to rival the pixel count of high-end, medium-format digital backs, or scanned 4×5 film cameras without the weight, bulk or cost. Here in Washington State, I imagined Prusik Peak in the Enchantments, or Indian Henry’s at Mt. Rainier, shot in a breathtakingly large angle of view and incredible detail. With digital, this is achievable—unless the long slog in to such locations deters.
The top medium-format digital back is a 60 megapixel, $30,000 behemoth. A scanned 4×5 produces even more pixels, but who’s going to lug either medium or large-format gear 3-5,000 vertical feet up a mountainside. As it is, 35mm, full-frame, 20+MP cameras are approaching medium-format quality. Stitching single-row images to make 60-100MP, ultra-high-quality files takes minimal technical know-how in the field, and—with the latest panorama software—minimal know-how on the computer. A missing link for backpackers is a light-weight kit to make it happen. I made some improvements on last year’s contrivance, and now have a practical 6-ounce tool to capture that dream.

I did an on-line survey of panorama hardware for this tip. What I found is that a lot of folks have been dreaming way before me. It is amazing what’s out there—clever innovation to match budget and need. As a caution, I haven’t used any of this stuff, so caveat emptor.
To make sense of it, I put the panorama gear in four categories: conventional, lens ring, light-weight, and inexpensive. I deemed conventional manufacturers like Really Right Stuff, Novoflex, and Manfrotto, big names in nature photography with expensive, heavy tools that generally cover the bases—including mulit-row—and presumably do it well. Really Right Stuff has an excellent panorama tutorial, too, if you need some background on key elements like leveling and parallax elimination. The lens ring gear was completely new for me—BoPhoto is an example. The lens ring is like a tripod collar for wide-angle, each one built for a specifc lens, and when mounted rotates at the nodal point. Holding the lens at its optical center instead of attaching to the camera body simplifies the engineering. They’re limited, though, to single-row panos, and only a few specific lenses have commercially available rings. For light-weight, I like the 16.7 oz. Nodal Ninja 3 Mk II, a fold-up bargain that’s got good reviews, and tough one to beat if top-quality backpacking panos is your goal. For inexpensive, the plastic Panosaurus is only $75. It weighs in at a moderately-heavy 31.6 oz.
With any hardware, best shooting practice doesn’t change. Use a solid tripod, shoot RAW and set exposure (f-stop and shutter speed), focus and white balance manually. Don’t use a polarizing filter unless there’s no sky in the picture. You can break the tripod rule and go hand-held if foreground isn’t close, and if you use a fast shutter speed. With plenty of light, if you can keep things level, a hand-held panorama can be indistinguishable from one painstakingly taken on a tripod. If you do have close foreground, parallax becomes an issue and you’ll need to accurately locate the lens optical center or nodal point, with tripod mandatory. I won’t go into that here. Check the basics with Really Right Stuff, or try not to get lost at Big Ben’s Panorama Tutorials. There’s lots of stuff out there.
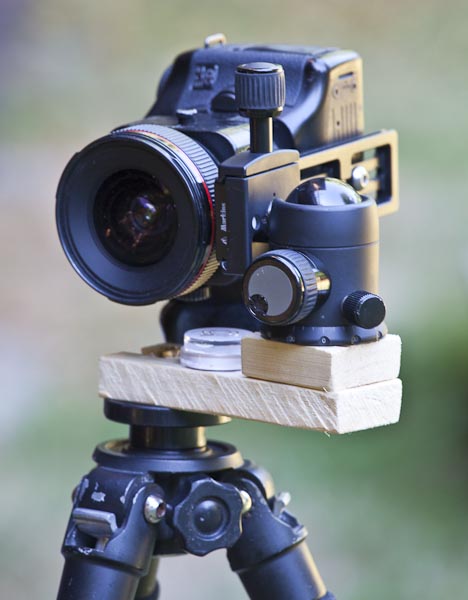
My block-of-wood solution weighs in at 6.5 oz. You need a tripod with a freely rotating center column, and a plate-type, quick-release ball head, the kit you’d be using for backpacking. I use a Feisol CT-3301 tripod (2.6 lb) and a Markins Q3 ball head (13.4 oz.). Add to this three pano parts: a long release-plate, a block of wood, and a circular level. I have a nice, long 2.5 oz. Markins plate, the PL-15. It attaches to the camera. One end of the 3.5 oz. block of wood attaches to the 3/8” tripod stud. The ball head mounts on a 3/8” stud on the other end, with spacing corresponding to the lens-to-ball head centerlines when the camera is tipped 90° to line up over the tripod. Because the spacing isn’t adjustable (I can’t easily move my drilled hole), the wood block only works with this specific ball head. The long PL-15 plate allows the camera to slide back so the lens nodal point (close to the front of the lens on zooms) centers over the tripod hole. The last bit is a bubble level. I use a $1.50 Craftsman circular level, rather than the more popular “double-bubble”. The Craftsman weighs about .5 oz. The tripod must be leveled, or the resultant image will require some heavy cropping at the least.
In sum, since I’d be backpacking with the ball head and a 2 oz. quick-release plate anyway, the net extra weight is 4.5 ounces if I substitute the PL-15 for the plate I’d normally carry. The set-up is also useable for limited multi-row. I can turn down about 30° before the mount shows up in the viewfinder (24mm lens). Shooting single-row with a 21MP camera gives me plenty to work with in any case.
In early August, I backpacked to Indian Henry’s at Mt. Rainier National Park— 3,000 ft. elevation gain and 7 miles in by way of Kautz Creek. The morning dawned mostly cloud-free; an intoxicating aroma of fresh lupine wafted over the meadow. I panned the scene, eye glued to the viewfinder. When I found the “wow” spot, I set up and leveled the tripod. As I composed the vertical panels for a panorama, I knew I had a good one as each panel alone could stand by itself.

At home on the computer, the assembled image was made from five verticals using Photomerge in Photoshop Elements 6, after enhancements in Lightroom. The resulting image is 10,802×5515 pixels, or 59.6MP, produced from my 3744×5616 pixel Canon 5D II. I didn’t have to crop much top and bottom to get the final image.
Gary