Edited 5/16/2012 Re: Case 5
On a recent shoot with the Canon 5D Mark III, I was photographing a Yellow-rumped Warbler, hand-holding a 500mm f/4 from a kayak. Routine for me—and should be routine with the new 5D III—but the camera failed to pick up the bird. I was on the bird with a focus point, finger depressing the shutter, and no release. I kept yelling (to myself), ‘pick it up! pick it up!’ The camera didn’t focus. The bird moved off. I missed the shot.
Disappointing, but bird photography is 90% disappointment (and 10% ecstasy) if you’re pursuing tough shots, and in this case I knew why. Canon has given shooters control over autofocus processing like never before. It’s for us to configure the set-up. I had meddled with the control variables, to the detriment of the warbler shot.
For Canon shooters—since the advent of the 1D Mark 1V and then the 7D—we’ve been given progressively better autofocus tools. The Canon 5D III and 1D X are another leap forward, with selective control to match specific subject movement. Canon has posted on-line guidebooks for the 1DX and finally (thanks Biju Arayakkeel for the heads up) for the 5D III. They do a thorough job explaining how to apply these new tools. See Canon 1DX AF Settings Guidebook and Canon 5D Mark III AF Settings Guidebook. Even if you’re a Canon 7D shooter, the explanations are useful, excepting that the 1DX and 5D III have more control options.
First, some set-up options you should use for bird-in-flight (BIF) photography, regardless of camera: Set the drive mode to Continuous (H), shoot in AI Servo (moving subjects) and pick an ISO of 320 for the 7D and 800 for the 5D III (even higher in low light). Photograph in manual exposure mode (M) unless the light is changing sporadically, as it might on a partly-cloudy day. For that case, use aperture priority (Av), and dial in exposure compensation as needed. Turn your lens stabilization switch to ON. If the lens has a mode 1 or 2 switch, set that to 2. If your lens has a distance limit switch, set it appropriately to reduce hunting. Additionally, shoot in RAW—it gives you more to work with in post.
Canon has put the 5D Mark III AF (and 1D X) functions all under one, magenta-colored menu tab, within which are five screens (AF1-AF5). We’ll look here at the first two, but especially at the first one—the Configuration tool—where we find control options to match varied shooting situations. Canons uses sport scenarios to make the match simple. For bird-in-flight (BIF) enthusiasts, I’ve gone a step further, translating each scenario with a bird image.
The Configuration tool has a column of six tiny sport icons, each representing an AI Servo set-up to match subject movement for the particular scenario. For example, Case 1, the default, has a runner icon, appropriate for many if not most situations (think big bird in flight). All the Cases manipulate three distinct control parameters (only the first one of which is available to 7D shooters): Tracking sensitivity, Acceleration/deceleration and AF point auto switching. Let’s digress a minute and discuss what each of these means, for BIF instead of sports.
Tracking Sensitivity. Controls focus when another object intrudes on the subject your tracking. When you lock on a bird (in flight or moving through the branches), and an object interferes as you track it, should you stay with the original subject (-1,-2), or jump to the interfering one (+1,+2)? For example, you’re tracking a falcon, and a shorebird flock rises up in front of it. A minus tracking sensitivity tends to stick with the falcon; a plus one goes with the intervening flock.
Acceleration/deceleration. For birds that change speed (accelerate), faster or slower. A duck comes at you, spreads its wings, decelerating to land (+1,+2). For a human sprinter coming right at you, Canon goes with 0 (constant speed). A medium-sized bird at 20mph, or a small bird, flying obliquely toward you, a +1 should return more keepers.
AF point Auto Switching. This control only applies if you’re using one of the Point Expansion or Zone (multiple focus points) Area Selection Modes. It’s not available if you’re using Single Point (or Spot) AF. It sets how rapidly the AF point switches to a new AF point. Say you lock on a bird, and it banks and moves off as you’re firing. A +1 or +2 tells the camera to change focus points and stay on the bird. Best used with 61-point automatic selection AF, to give you the whole range to switch to. Note: In my use of the 5D III so far—with medium-sized birds—the camera isn’t reacting fast enough (well, I’m not either). But I now think AF point Auto Switching is useful, and may be the ticket on select tough shots.
OK, back to the six Cases, and which to use for BIF scenarios:
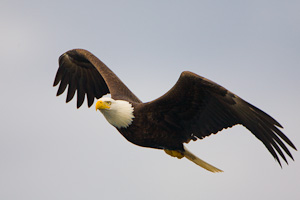

Case 1. Versatile (default) setting: 0,0,0. Good for medium or large bird in flight, open terrain, not flying right at you. This could be your standard setting, unless you like Case 2. The 5D III gets on the bird and stays steadily on it if you stay on the bird. Example: Bald eagle.
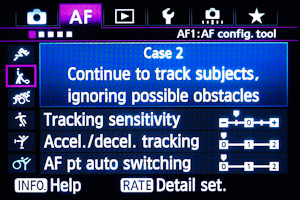
Case 2. Ignore obstacles and keep tracking subject: -1,0,0. Example 1: Peregrine Falcon. You’re locked onto a Falcon as it ducks behind a flock, and you want to stay on the falcon. Example 2. A medium-sized bird in thicket where you want the camera to ignore interfering branches as you follow a birds movement (use the Single Point Spot AF as well).

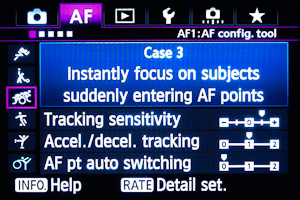
Case 3. Instantly focus on foreground (i.e. obstacle becomes subject): +1,0,0. Example: You’re photographing a flock. It makes sense to pick up the nearer birds. Or consider a pair of birds in flight; makes sense to grab the near bird, not the far one, even if you started with the far one.

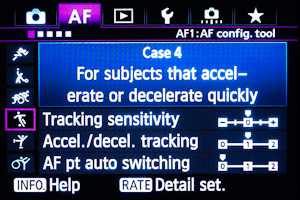
Case 4. Large or medium bird coming right at you, coming in for landing or whizzing by: 0,+1,0. Example: a Wood Duck leaps off the water, flies at you, and spreads it wings to land.
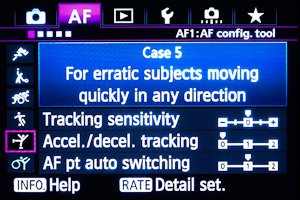
Case 5. For birds that change direction, leap latterly off a perch, or when you have difficulty staying on it. 0,0,+1. Useful especially with 61-point AF expansion, and non-busy backgrounds, for example by parking the bird at a corner AF point, in anticipation of it flying “into” the frame. May not be quick enough for small and medium birds. Raptors chasing each other could be a good application. Or the irregular wingbeat of a woodpecker.
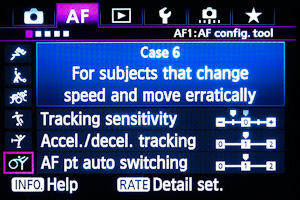
Case 6. -1,1,1.
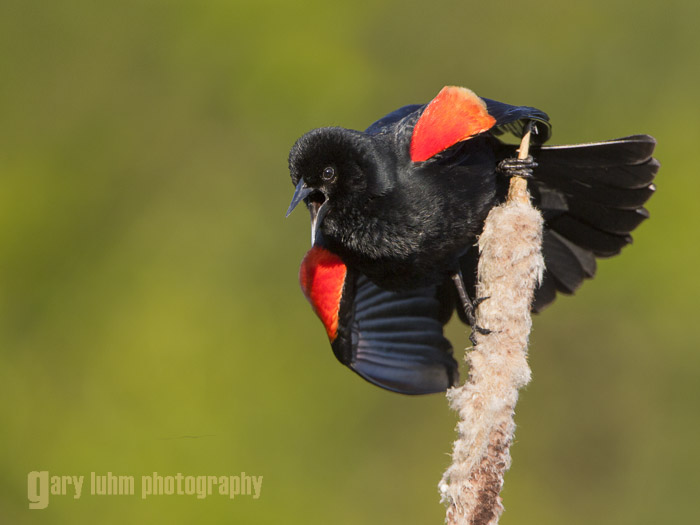
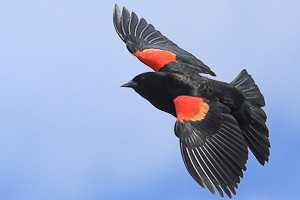
Case 6 (customized). Small or Medium-sized bird coming at you or flying obliquely toward you. You have difficulty staying on the bird because it’s small and fast: -1,+1,+1. I’ve customize this to add a -1 Tracking. You don’t necessarily want to change focus points, but you surely don’t want to focus on the background if you lose the point. And the bird is changing speed. So far, I’ve had success with this setting for Red-winged blackbirds in flight, and smaller birds in thickets.
The second screen (AF2) under the AF tab also needs consideration. It sets up AI Servo focus or take-a-shot priorities. When you press the shutter, what should happen? Do you want the camera to assure focus before release, or not wait so long and capture the image even though it may be out-of-focus? (7D shooters have the same set-up option. Or dilemma.)
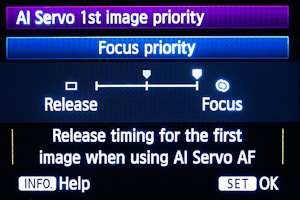
I’ve set-up my 5D III to favor focusing for first image priority. So—as with the Yelllow-rumped Warbler—I can see why the camera didn’t immediately grab the shot. I was in a moving boat, and though it didn’t seem a difficult shot, my focus point may have strayed as well, and I was using the Spot Single shot, because of potentially intervening tree branches. In any case, I’m sticking with focus prioirty for now.

After some deliberation, I’ve set my second image priority to split between focus and shoot. Once on the bird, I think getting some shots rapidly is at least equally important.
Summary. No control scheme is perfect. A quick response might get you a shot, or be unstable and hence miss even more. I’m pleased we’ve been given some control. Go with the settings you think best matches your situation, and be prepared to make changes to match conditions in the field.
One more note: Put your settings back to your personal defaults after every shoot. When you next pick up the camera, you want to start from your known baseline.
Gary
Thanks for the info. I have a 5mk3 and a 70-200 is2 canon 2.8 lens.
The 200mm should be perfect for many bird situations, like flocks of birds, birdscapes at sunrise, large tame birds or tolerant birds at the nest. I use an old 200mm f/2.8 for backyard nuthatches, which are quite tame, but when I do that I usually focus manually and control the shutter with a cable remote to get flight shots as the parent birds approach the nest.
Thank you, Gary!! I just got my 5D mark III today and am going to try to use it tomorrow with my 400mm 5.6 lens. I am going from a 60D, having used a 1DS as well. The autofocus is very confusing and I appreciate you helping to break it down for me. I will have to see how it goes for the BIF shots. Thanks again!
Gary
Glad you found the post useful. I recommend a lot of experimenting with the autofocus modes. It takes a while to understand how they work together, and when modifying each is appropriate. I would suggest leaving it on the defaults for a few weeks before changing anything.
Gary
Excellent post! I’ve been looking for a guide like this. The only thing I disagree with is shooting in RAW. My computer takes longer to process the larger file size which makes it a pain if I go through hundreds of pics to find the right one. Also, it decreases the camera buffer so you have less shots to make and will cause a delay in your frame rate. The other thing, although I can’t say for certain, is using IS, especially in good light conditions. I’ve read that it slows down the focusing and is not needed at the high speeds.
I do have a question. What settings do you recommend for swallows at low levels with a cluttered background?
Hung
While it’s true RAW processing takes longer, I find the processing benefits well worth it. Unless you nail the exposure in good light, and even when you do, the RAW file has more information to work with. I wrote about RAW vs jpg a while back that discusses that point. Your other comment, that IS (image stabilization) is not needed at high speeds, is correct, though I’ve not done testing to figure just what speed. I’m also not sure if it slows the auto-focus if left on, but that may be trivial. My main problem remains keeping the focus points on moving subjects; that’s a skill we all need to work on.
Gary
Thanks Gary,
I took recently added 5D Mk III to my 7D. The autofocus options seemed a bit overwhelming so I sought out advice by doing a web search which led me to your site. It helped give me set it out for a morning outing the day after purchasing the new camera. It worked well paired with the 500 f4.
Dana
Dana
Glad it helped out. I just returned from a trip where I was shooting through reeds on a lake, photographing Grebes. Using Case 2, the focus held consistently without reverting to the foreground. Prior cameras would almost always fail with such interference. I’ll post a picture later.
Gary
Here’s an example of Case 2, tracking subject without switching when objects interfere. After acquiring focus, the focus stayed with the subject for 16 straight images, despite foreground reeds that could mess it up.
You say the “focus held consistently without reverting to the foreground”. Is all this BIF focus maintenance discussion assuming that we are shooting a dozen shots in continuous mode? Or at least assuming that once the button is half depressed, it is never let up again?
What is the trick of “locking on the bird” in the first place?
Rick
Good questions! My assumption here would be yes, we’re shooting in continuous mode, probably firing a burst, maybe pause, re-focus if you need to, then another burst. I also shoot RAW, which means the buffer on the 5D III fills quickly, which is often why I pause. Your second question, once the half-depressed button achieves the correct focus, then yes, don’t let up on it, unless of course the focus is lost. When focus is made difficult by interfering reeds, tree branches, etc., the “trick” I use is to focus using the center focus point only, set to Spot (Single-point Spot AF). Then to get on the bird, I depress the shutter halfway, perhaps again and again, until I’m satisfied with the result. Then I shoot, or, if I’m waiting for action to happen, keeping the shutter held halfway. This essentially locks the focus (I’m almost always in AI Servo which means the focus will try to track the subject) until action happens. When it does, I fire a burst, pause and wait for peak in the action, then fire another burst.
Gary
Gary: I too appreciate your teaching. Also your skill in these bird in flight shots. It’s certainly something I will have to work on. I started with a 7d with a 100-400 L lens. Now I also use the 5d mkIII on your advice. I am not a boatman but I have fount that Hawks will allow a man on a tractor to get closer than a man on foot. In particular the juvenile Red Tale . But as soon as the lens comes up they get irritated and prepare to launch. That is the moment when focus lock is needed.
All very fun stuff. Thank You again for the inspiration. Just a beginner ,Greg Aldrich
Greg
Thanks for the post. I can see a problem with a tractor is that, moreso than a car-as-blind, you’re in full view, and birds see and sense movement far better than we do. In a kayak, I always approach obliquely when I’m worried about a bird taking flight. Sunglasses help, as does camo on the lens. Don’t look directly at the bird except when you look through the lens to get the shot. Sitting on a tractor, you might try using a ghillie suit.
Gary
Thanks for the info, Gary. Very helpful. I was wondering when you said you switch to single AF point and then let the AI servo take over, do you mean set up a starting AF point in Automatic AF point selection, or truly switching to Single point? Will AI Servo continue to move the AF point through a burst?
Also – what about small birds flying back and forth to a perch (where you can only see the perch)? I’m thinking that the Case 5 maybe modifying the AF point switching to a 2? I’m looking to get some shots in a burst in flight on the way to or away from the perch, and maybe some on the perch as well. Should I be focusing on the perch and hold the shutter half-way, or wait until I’m shooting?
My biggest problem is taking the camera down to switch the AF settings around. Do you use the custom shooting modes for this? Do they save the AF point settings, etc? It seems impossible right now to move the starting point of the 61 pt Auto AF point selection when not in an open field, or something. When they are buzzing about in the woods, I’m doing good to get the camera up to get a shot off some times.
I really appreciate the efforts you took to talk in the same terms as the settings are in the camera. I was on Rockwell’s site looking at some things and weren’t able to be sure of some of the settings he was talking about.
Ron
Great questions; gets to the heart of a lot of tough bird photography.
To answer your first question, if you switch to single point AF while in AI servo, AF point switching (auto switching) is not engaged, so no switching can occur. AI servo is all about focus, not focus point. If you’re in single point AF (or spot AF), the focus tries to continuously follow the subject on that point only. AF point auto-switching is turned off.
Your second questions regarding birds flying from a perch and back (like a flycatcher, for example) is a tough one. In many of these instances, it’s best to focus on the perch, and maybe push up the ISO and f-stop (to retain decent shutter speed and gain depth-of-field), and then turn off autofocus altogether. With the camera on a tripod, use a cable release, and fire a burst whenever the bird leaves or returns to the perch. There’s no need then to even be looking through the viewfinder. Review your initial results on the LCD and adjust focus and everything else as needed.
I believe the custom shooting modes (C1, C2, C3) will save the AF settings, including the AF point, Case, shooting mode, etc. It will save the initial focus point for 61-point AF mode, but of course that may quickly jump off it if the precevied subject moves or changes. Hope that helps. I rarely use the 61-point mode. Most often, I try to keep the bird on single-point.
By the way, I feel like “I’m doing good to get the camera up to get a shot off sometimes” too.
Gary
Found the above tips extremely useful as I definitely could do with some help. I have recently got a 5D markiii with a 300 2.8 lens plus 2xconverter and over the weekend was trying unsuccessfully to take shots of kingfishers diving in and bringing fish out of the water landing back on the same perch. They used the same perch each time but tracking them as they dived in the water(which wasn’t always the same place!) was tricky and I didn’t get one sharp shot of him coming out of the water with the fish. Would you use Case 5 in these circumstances and what Tracking/Accel/AF pt settings would you use. I was using ISO 800 and sometimes 1000. The f-stop was f5.6. We were in a hide and another chap (Nikon) was focusing on the water and being v. successful using a similar setup. Would I have been better taking the extender off.
Veronica
Wow. I envy your situation. Kingfisher are such shy birds, and even finding a good situation for a blind is difficult.
I’m not surprised you didn’t get sharp pictures. If the bird is hitting the water in different places, I wouldn’t have either, and I don’t know how anyone could. I’m sure I couldn’t follow a kingfisher to the water and stay on the bird enough for autofocus to work. I don’t think Case 5 would react quick enough, so if I stuck with auto-focus I would probably also stick with Case 2 because I’d worry I lose the focus to the background. Along with Case 2, I would remove the extender or drop to a 1.4x, add more depth of field, like f/8 or even f/11, and push the ISO to 3200 to get a faster shutter speed. However, the ideal situation would be to change the set-up to force the kingfisher to dive to a predetermined area, and then manually focus. Maybe build a 2 foot wide box of wire mesh and wood, anchor it to the bottom under a favorite perch, and put in bait. Then use a very fast shutter speed (like 1/4000sec), at least f/8, an ISO that will end up about 3200, and manually focus on the middle of the bait box. When the kingfisher leaves the perch, start firing.
Hope that helps. Let me know if you find something that works, and good luck.
Gary
We saw the kingfishers at Brandon Nature Reserve, nr. Coventry. Large Reserve with a number of hides and the kingfishers were on a natural looking perch reasonably close to the hide. There is no way of baiting them or changing your position except in the hide which seats about 5 people. Unfortunately Brandon is a fair distance from us otherwise I would be back there tomorrow. We have a Nature Reserve nearer us with kingfishers although they don’t venture so close but I will try out your suggested settings and see how I get on. I managed to get some great shots of kingfishers with fish on the perch.
Many thanks for your suggested settings and also the different ‘bird’ examples for each Case No you explained earlier. It takes a bit of working out.
Veronica
Thanks for filling in the details. Kingfishers are a difficult subject. If you get back to Brandon, I would stick with the 2x and go to manual focus and f/8 or f/11, and of course up the ISO. Auto-focus on the bird on perch, then switch to manual focus and hope the bird stays in the plane of focus.
My last photo tip, http://garyluhm.net/big-lens-low-light/ I shot manual focus after picking a spot to focus on. In that case it was because the light was so low I didn’t want any hands on the camera to jiggle the exposure, one of the problems shooting a long lens.
If you’d care to share a small jpg of your Kingfisher on perch with fish, please do.
Thanks,
Gary
Hi Gary
This is one of the kingfishers with a fish I took, which was pretty big for him. Unfortunately as you can see, the sun was immediately overhead but you have to take the pics when you can and I don’t think I’ve blown the highlights. What do you think of it Gary. Mind you a shot of it pulling it out of the water would have been better! It was all very exciting
Veronica
Lovely bird! As good as you can expect for overhead/backlit, mid-day light. I see some noise in the darks, but it doesn’t factor that much. Exposure, sharpness, composition all excellent. Background looks good, but would surely look bad at f/11. Kingfishers have remarkably small feet; I suppose a thinner perch would be preferred.
Gary
Hi
what if birds are coming straigt at you, I tried the -2,2,2 but then NO frames came out sharp on a Mew gull going right for me 🙁
Any suggestions what I should do? Great article, just what I needed to start getting under the skin of the 5D3!
5D Mkiii and 300/2.8L + 1.4xIII
Yours Stein, Tromsø, Norway (70 N)
Stein
Birds flying straight at you are about the hardest for autofocus to get right. Do everything correctly, with perfect technique, and the focus is often just behind the eyes, on the neck or sometimes even the feet. The focus system just can’t keep up.
First be sure you’re in AI Servo, so focus tracking is continuous as the shutter button is pressed, and it continues through image capture. Then to speed up the tracking, setting the second Configuration setting (Acceleration/deceleration) to +1 or +2, as you are doing, may be helpful as birds are faster than humans and an acceleration component may be a factor (Canon does suggest 0 for human runners). The first and third Configurations may not be so useful, but I’d try -1,+1,+2, as well as plain vanilla 0,0,0. I would also suggest using the center point for focus, or the center point plus a few surrounding points. Then concentrate on keeping that center point on the bird, a learned skill.
A good experiment would be to test your settings on an easier subject, like bicycles coming right at you on a bike trail. Then perhaps try working bigger birds, like an eagle or heron; they don’t accelerate or veer off so quickly. Also, try pre-focusing at the distance you want the bird to be in focus, and when the bird reaches that point (i.e. comes into focus), and you’re on the eye, then fire away.
Good luck,
Gary
G’Day Gary
Very informative article and I read with interest the comments. I have a Canon 1DX with a new 400mm f2.8L IS USM II lens for my BIF kit. I really am struggling to get good shots as the autofocus seems to wander off. It is sharp in the viewfinder but as I press the trigger the focus shifts giving soft results. It has been back to Canon to remove oil from the mirror (apparently some manufacturing issue) but the issue is still there. As the 1DX & 5d MkIII share the same auto focusing systems have you heard of similar issues? Or can you offer any advice on getting the focus lock to work. I have attached an image of this Flame Robin who was only 25 yards from me. You can see the focus has shifted to the area below his feet – very frustrating. cheers Wooly
Wooly
Thanks for the comment and the accompanying image. Although the Canon 1DX and 400mm f2.8L is a great combo, you may find tracking BIF more difficult because of the swing-weight of the f/2.8 lens. It’s better than the 600 f/4, though, because it’s a shorter lens. I use a 500mm f/4, but sometimes I drop down to a 300 f/4 to more easily keep on a bird, usually when handheld but also on a tripod.
The Robin image you posted with focus on the ground, rather than on the bird, is a pretty typical result. I’ve shot plenty of those; it’s a very tough shot. Especially with a small bird leaping off a perch toward you, neither the auto focus nor your finger can react quickly enough. Let’s say you use all points autofocus. The bird leaps up, and the autofocus picks the spot of closest focus, which is the ground the bird just left. Let’s say you have center focus point only, which I might recommend. The bird leaps up, but you can’t stay on the bird, and therefore loose focus. If you do stay on the bird, it’s accelerating toward you and the auto focus can’t handle the acceleration, so it focuses somewhere mid-bird. If you manage to stay on the birds head, quite a feat, the autofocus will probably hunt (jerk) in and out of focus as it attempts to get it right. Usually success comes with bigger birds, which are easier to track and don’t change speed or direction so quickly. Photographers who have success with small birds in flight usually find a way to limit the birds plane of flight, and have a lot of chances. An example would be a nesting situation, where the bird will fly from a perch (maybe one you’ve set up) to the nest on a predictable flight path.
If you anticipate a small bird leaping toward you, one strategy is to focus manually in front of the bird, and then hold down the shutter when it moves. If you get a few chances, you may then get one or two keepers with eyes sharp.
Hope that helps,
Gary
Hi Gary: I was hiding behind tall grass and sneaking-up on a group of Buffle-head ducks on a pond. They heard me and took-off. About eight birds were flying parallel to my camera and I pressed the shutter button to no avail – I was experiencing the “focus priority” restriction for the first time and missed a great shot. I have since set my 5DMiii to the centre point between release and focus. The feeling i had when the camera would not take the picture was awful. i don’t want a repeat of that!
Love your tipe bye the way and more your work.
John
Thanks for posting an image along with your comment. Most BIF (birds in flight) attempts are failures, for many reasons. If you had been on shutter priority, you might have nailed it, but then again, the result might be slightly out of focus or blurred from camera movement that didn’t keep pace with the birds. It takes both a lot of opportunities and a lot of practice to get right even a modest percentage of keepers.
I checked your metadata and it looks like you used a 300 f/4 w/1.4 attached, or 420mm. This is an excellent flight shot combination. Keep using the center-point, and find locations where you can get a lot of practice with flying birds. Places like the Reifel refuge in BC, or your local city park. For Bufflehead, being on the water in a kayak is tough to beat for opportunities.
Gary
This is an extremely useful information for a new mark iii guy like me. As I am not into much sports/birds photography, didn’t realize how effective this new feature in mark iii going to be until I went to a f1 racing last week. I found it difficult to gain much from the default setting and was trying to read more about how to use it well and found your article. It is surely useful and I can start experimenting better now. I also found another article from Canon Professional Network (CPN) below and thought of sharing. Please disregard if you have seen it before.
Thanks once again and wishing you all the best.
http://cpn.canon-europe.com/files/product/cameras/eos_5d_mark_iii/AF_guide_EOS5D_MarkIII_eng_January2013.pdf
Biju
Thanks for the comment and link. I’m glad you find the tip useful. Especially thanks for providing the link to the Mark III autofocus guide. That wasn’t available when the camera came out and I and others needed to rely on the Canon 1DX guide to make sense of autofocus parameters. When I get a chance, I’ll link to this guide up front in the tip.
Gary
Hello Gary,
Enjoyed reading your article it is very informative. I’m shooting with a 60D at the moment with a 100-400. Upgrading soon to a 5D mark iii. I shoot mainly harriers and eagles when I get a chance. Mostly harriers as its my favorite raptor. As you know they move very erratically and can turn on a dime. What settings or case have you used with success in photographing them?
Thanks, Anthony
For configuration settings, I’d stick with (-1,,0,0), my most used setting for BIF and for birds like Harriers and Short-eared Owls. The -1 keeps you on the bird longer if you don’t stay on the bird with the focus point, and for most of us, that happens a lot. Too, Harriers are medium-sized, so I think you’ll get more keepers with a more versatile setting. Stick with 0,0,0 or -1,0,0 until you get a good feel for their capability. Otherwise you won’t know if switching settings produced a net gain or not.
Great Tuorial very helpfull
Regarding manual settings for BIF.
I shoot a 5D mkII. My standard setting (manual in RAW) is AI servo , Iso 1600 and 1/1600th.
I have found that cormorants, ducks and smaller rosella and honeyeaters all move their wings faster than a 1000th will freeze.
I use a 100-400mm lens set on f5.6.
If I can see a slight shadow on the ground I can use this setting without thinking knowing I have got +- 3 stops shooting in RAW. If a bird is in shadow , not moving much I lower the shutter speed as needed to give me the equivalent of f2.8.
If I am walking around on a bright day I will leave the setting stopped down a bit-it saves time when you haven’t got any.
But, for having the camera ready and no time to think, my standard settings gives great results…most times.
Peter
Thanks for the comment. The bird you posted looks perfectly exposed. Shooting in manual is preferable to Aperture Priority for many, if not most, cases, for birds, particularly birds in flight as you suggest. The best example is a bird taking flight, which starts out with a dark foliage background and then quickly a bright sky. There’s no way Aperture Priority can get both right, so Manual is the way to go.
It seems to me your standard setting risks over-exposure on a bright day, but then you do say you stop down a bit. Check your exposure against a plain background and adjust for tone, and check also against the sky (+1 to +2-1/3) to make sure your ok.
Gary