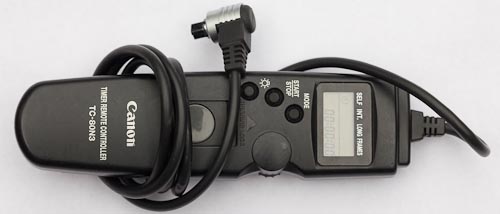
I try to simplify the photo gear I take on trips. The idea is that photographing unencumbered by stuff will make the journey easier, and the photography more fun. So I decide beforehand which lens(es) will be most useful, and just take those. Going digital assists simplification. Filters, other than a polarizer and maybe a neutral-density, aren’t needed. An 8 GB card snaps hundreds of images compared to 36 for a roll of film. But a device I’ve had since the ‘90’s—and carry now more than ever—is a remote release. I use the Cannon Timer Remote Controller TC-80N3. At 3 ounces, it’s no more a burden than carrying a spare battery. For super-sharp, tripod-mounted images, and for expanding your shot repertoire, it’s a practical tool. The TC-80N3 fits Canon cameras with an N3 port—the professional models, the 5D and 5D II, the 20D series and the new 7D—almost everything but the Rebels.
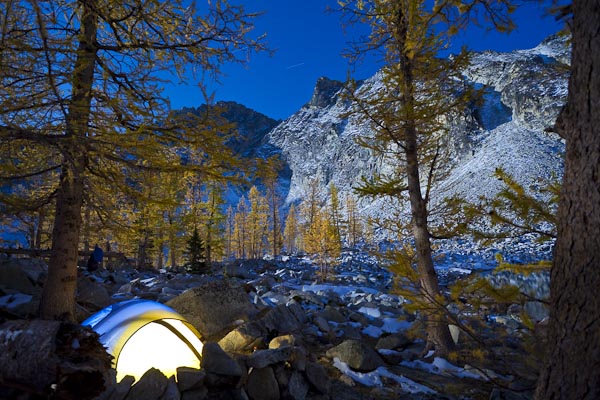
For a straight remote release, the Canon RS-80N3 and a few third-party devices fit the N3 port as well. They serve as an off-camera switch or to lock bulb exposures, and may meet your needs. The TC-80N3 does more, though, with programmable time delay, interval, long exposure and shot count. The moonlit shot shown here could be done with the RS-80N3, but you have to be there for the start and the stop, plus watch the clock. The long exposure mode of the TC-80N3 lets you set a precise time, and it stops the exposure when it times out.
Using a remote for HDR (high dynamic range) images can be helpful in conjunction with AEB (auto-exposure bracketing) to assure each set of (3) images are in precisely the same register (that is, each pixel in one image maps to the corresponding pixel of the others in the set, the only difference being exposure value). Problems arise if you’re turning dials to change exposure, or pressing the on-camera shutter, causing the camera to subtlety misalign. For a three-image, HDR set-up, do some test shots to determine the exposure and amount of bracketing, then go into the menu, find the AEB, and adjust the bracket amount. Set the on-camera drive to time-delay (2-sec if you have it). You don’t need any programming on the TC-80N3 (and therefore the RS-80N3 can do this, too). Just press the remote release button once (not the start/stop), and the camera should fire off the three frames.
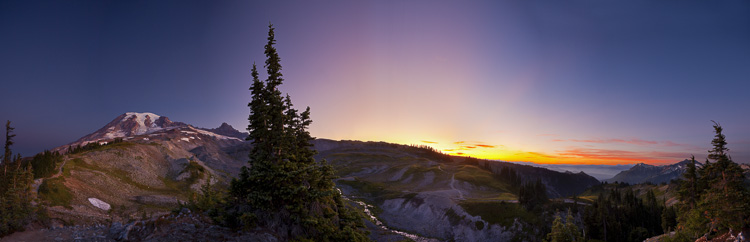
I’ve found this especially useful for panoramas when you know you’ll need to combine different exposures to get detail in both sky and land. This method keeps the registry fixed, and it saves time.
If you prefer setting mirror-lock to Enable to reduce vibration, control with AEB changes from “one-click for three exposures” to “two-clicks for one”. Mirror-lock can be crucial at shutter speeds in the range of about ¼- to 1/60 sec. So if you need to use mirror lock, set it to Enable in the Custom Functions, and then press the remote button once to lock the mirror, and a second time to get a shot. Repeat two more times to complete an auto-bracket set.
The interval timer on the TC-80N3 invites ingenuity—time-lapse photography, wildlife sans photographer, scenics in changing light, getting yourself in the action. For me the interval timer is useful for dawn kayaking shots or while paddling or backpacking solo. I position the camera on the shore, boat or trail, then program a time delay, interval between shots, and number of frames. The time delay isn’t usually necessary, but it does allow me to get into the scene before the shutter starts clicking off images. I’ve also used a wireless remote trigger, like the Canon LC-4, to get similar images, as well as the tiny RC-1 that works on some cameras (including the Canon 5D II, 7D and the Rebel series). With the LC-4, a distant camera location can be used so you can mount it up on a cliff, for example, but with either the LC-4 or the RC-1, it’s the two-second time delay that makes it particularly useful: push the remote button, pick up the paddle (or do whatever activity), get a shot, repeat. But back to the TC-80N3—setting the interval timer and shot number gets you dozens of images to choose from quickly and in one go, making it a better choice in most instances.
The Canon RC-1 is a minimalist choice and—at $20 and .9 oz—a backpacker delight. Its infared signal works with the Canon 5D II, the new 7D and the Rebel series at distances up to five meters with fresh batteries. Many of the old film bodies work as well. In use, set the camera Drive mode to time-delay, but pick any of the dial Shooting modes, including Bulb. Pushing the RC-1 trigger then over-rides the on-camera timer with whichever choice you selected—immediate shot or 2-sec delay. On the 7D, Canon moved the camera infared sensor to the battery grip, a better location if—as I assume—it makes shots possible from the side as well as the front.
If you’re employing the TC-80N3 for time-lapse photography and find the 99-shot maximum of the frame-count limiting, no worries. Set the interval timer to the desired interval, and set the shot count to zero. The camera will record images until the flash card fills up.
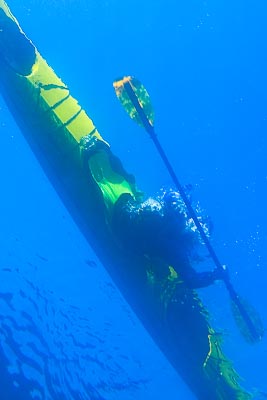
Recently on a clear mountain lake I put my Canon 5D II in a tethered housing, along with the TC-80N3 and some lead weights. I programmed the Remote—setting time delay, interval and shot count—closed up the housing, and dropped it over the side. The kit settled on the bottom, with the lens facing up as planned. I did a few Eskimo rolls and braces while the interval timer clicked off the images. The picture at right is from the series. Of course, you might do better with a partner using scuba gear, but creative tool use produces alternate solutions.
Gary