In general, questions and answers here favor photographing from a kayak or in transporting photo gear by kayak. Other advice can be found in the blog, and a gear list for backpacking can be found in Tools.
If you don’t find an answer here or have additional questions, send me an e-mail at: gluhm@garyluhm.net . I’ll answer any reasonable questions, especially as they pertain to on-the-water photography.
Last update: 2025/01/24
Your 2024 Favorite birds are all local. Why so?
Local photography is easy for you to do. You’ve been kayaking and biking for years.
What camera do you use?
What lenses?
How do you manage your digital workflow?
Isn’t Lightroom slow and hard to learn?
How do you keep your camera equipment dry?
Your pictures look so crystal clear. How do you achieve that?
How do you get sharp pictures by kayak?
What kayak do you use? Any advice on kayak choice?
Any suggestions for wildlife photography?
What would you choose for a wildlife lens?
Anything more to say about bigger lenses, like a 500mm or 600mm?
Any other advice?
Your 2024 Favorite birds are all local. Why so?
It’s a statement of alarm regarding our warming planet caused by fossil fuels. As well, photographing locally means more time in the field.
Our planet is in trouble. In recent years we’ve recorded record high global temperatures, a trend that is irreversible in the short run, and destined to get worse with the carbon dioxide already polluting our air. Evidence tells us we are not in a new normal. We are in a human-caused, rapid (geologically speaking) transition to a hotter earth. And please, our warming earth is not caused by (red herring) 100,000 year cycles, another of a relentless string of lies pushed by deniers.
 Photographing locally means less travel time, not to mention less hassle and lower cost. And local communities, especially here in the Northwest, have a lifetime of photographic opportunity. I’ve found the more I learn about local environments—local habitats, species, landscapes, seascapes—the more I realize opportunity will never run dry. It feels good knowing what’s happening close to home.
Saying no to polluting travel (for many, the biggest carbon footprint in our consumerist lifestyle) can feel like missing out on exciting or enlightening experiences, especially, I think, if your friends frequently travel or are addicted to social media. Real shared needs—for companionship, community and nature—can be accomplished, and better sustained, at home and offline. Simple things like meeting for coffee. Daily local, social walks and volunteer work. Getting to know your neighbors. Connecting with locals spurs a love of place. It’s worth considering whether chasing the “exotic”–without understanding, relationship or responsibility–is actually a form of exploitation.
Something I’ve noticed about travelling long distances for photos: Photographers mostly check a box, doing what others have done, capturing exotic portraits, but not likely inspired images. Exceptional photos come from learning about and immersing yourself in a subject, time in the field and thinking creatively, not by travel.
Specifically regarding bird photography, I’m incorporating Joan Strassman’s “Slow Birding” ideas. Strassman’s focus (for birds) is local and immersive. As she states, “Less motoring; more time birding.” Choose a 10 or 20-mile radius around home; carry a stool, sit and watch, study species. The bicycle fits well here. And I’m finding that photographs subsequent to species study can be a treasure; it’s like adding a third dimension to flat 2D images.
Local photography is easy for you to do. You’ve been kayaking and biking for years?
I’m fortunate that many years ago I embraced human-powered transport: the bike and the kayak. I’m now enjoying bike rides to photograph at numerous local parks when it’s not too cold or wet. A bike can transport camera gear for many shoots; it’s the ultimate in parsimony (also the planets most efficient transportation). The sea kayak is an even better asset for photography, opening a door to another, satisfying world. It was also the core of my professional business for 20 years. So, yes, it’s easy for me to get around locally on a low-carbon budget. It’s also a reasoned choice.
Since August, 2023, I’m shooting with the Sony A6700. In August, 2024, I added a Sony 300mm f2.8 lens, now my go to for birds and other wildlife. The camera 1.5 crop factor turns my A6700 into a 450mm f2.8, rather shocking. I generally don’t feel the need to add a 1.4x tele, but I still have my Canon 500mm f4 for distant, tripod work. Since I sold my Sony A7 IV, I am now for the first time since 1979 without a 35mm body, or what we call now a full-frame camera. I don’t think this will have much effect on my landscape photography, which in any case has been largely idle, but the crop-frame A6700 is a capable landscape camera, and along with some outstanding APS-C lenses halves the photo-gear carried-weight for backpacking. I particularly like my APS-C Sony 15mm f1.4 lens, fast and sharp for landscapes, for night shooting and (yup!), even for wildlife.
What lenses do you use, while kayaking or backpacking?
If bird photography, my go-to is the Sony A6700 with the Sony 300mm f2.8 lens, whether by land or by kayak; by land, often with a 1.4x attached. For backpacking, the A6700 with two light-weight lenses, usually the Sony 18-135mm (27-202mm equiv.) and the newish Sony 15mm f1.4 (22.5mm equiv.), w/tripod and accessories weighs in about 5 lbs., not much of a burden for treks into the backcountry. I may carry the Sony 70-350mm f/4.5-6.3 lens if I anticipate wildlife.
On-the-water, I keep the camera gear in a Sagebrush dry bag(s) (see below) in the cockpit, usually with the Sony 300mm f2.8 mounted on the A6700. If I also carry the Sony A6300, it holds the Sony 18-135 or the kit 16-50. Keeping the Sony A6300 with wide-angle zoom handy takes up hardly any space.
Additionally, I have several other small, APS-C lenses, a Rokinon 12mm f/2, a Sigma 30mm f1.4 and a Sigma 60mm f2.8. All are sharp, small and light.
How do you manage your digital workflow? (edited 2024/01/24)
This is a great question. I use Lightroom Classic CC. For workflow, after image capture, I import, sort, discard and process images all within Lightroom. I use it exclusively to assemble collections for submission. Lightroom web galleries can quickly show clients images. With a custom web template that has the FTP address for upload built in, all I need do after creating a collection is bring them into the web module, change the title and destination folder, click on Upload, and then send a client the link. It’s fast and easy, taking advantage of Lightroom’s well-designed search, collection and simple web features.
![]Lightroom library module showing thumbnails in content area, left and right panels and film strip.](http://garyluhm.net/blog/wp-content/uploads/2013/03/lightroom.jpg)
Lightroom is a metadata-driven image editor and catalog—an archive and a darkroom. It’s a database—not a file browser like Breezebrowser, or Canon’s ImageBrowser. With Lightroom, you have to import your images into it (actually just the locations of the images, so you don’t have to disrupt your existing file system). Once in the catalog, RAW files especially can be manipulated non-destructively, with results saved in metadata as a “recipe” that takes just a few bits of hard drive. These “recipes” can then be applied to a whole shoot: optimize one image, then press Ctrl A (Windows) and Sync, and you’ve optimized the whole lot. Recent Lightroom Develop features I particularly like are Masking to automatically select Background or Subject because they are almost-every-image useful and time-saving, and the new Enhance Denoise, which like Topaz uses AI to smartly clean up noisy files. Lightroom Classic CC doesn’t replace Photoshop because for much individual pixel work, especially when layers are needed, Photoshop still fills a need. But Lightroom keeps adding features. HDR and Panorama erode that need for Photoshop. If only Lightroom would allow layers (sigh).
Importantly, I’ve cut the size of my image library in half since moving to Lightroom, mostly by discarding old TIF files, replaced by better RAW “recipes”. Of course, some PSD files with layers I still need, but with Lightroom′s adjustment brush and other new features, most images don’t require creating a TIF or PSD that balloons the size just to allow destruction-free work in Photoshop.
Briefly, at my PC I put the SD (SDXC) card into the reader slot. I’ve set up Lightroom preferences to detect the card, and the images show up automatically in an import dialog box. Within a keyword box I add general words applicable for the shoot, and sometimes select a custom processing preset. I shoot only RAW images, so a processing preset is a time-saver that adds a recipe of enhancements—stuff like vibrance, fill light, chromatic aberration removal, etc.—so the rendered jpg looks “improved” as it enters the Lightroom Library and often needs little work. An automatic Metadata preset enters IPTC copyright information. Importantly, when I hit the import button, the images are copied to a folder named by date (year-month-day).
I don’t do a backup on import because I prefer to purge junk first. After throwing away 50-90% of the imported images (which takes two or three passes), I do a group rename, add more specific keywords, rate a few of them (1-5 stars), and backup the new folder to an external drive. Periodically, I also back-up to a third hard drive. Lastly, I put the SD card back in the camera and reformat. This all goes quickly unless I have lots of similar images of good quality and I feel the need to pare them down. Important to note, the higher performance SDXC cards write fast enough for 4k 120 fps video recordings of the Sony A6700.
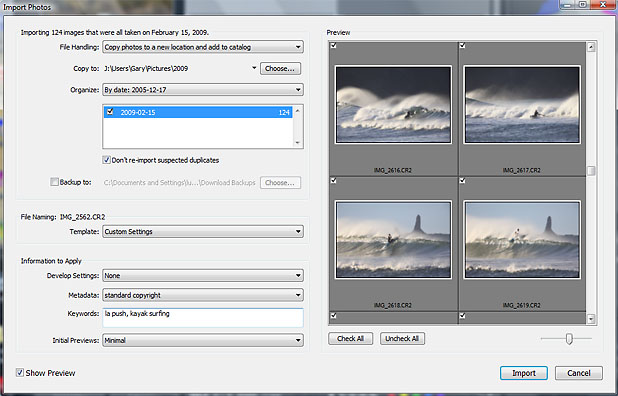
On import, the new images go into a year folder inside my Pictures folder, organized by the year-month-day labeled folders. That way each new folder follows the last one at the end of the list, making backups easier. I use the year folders to reduce the number of folders shown in the Lightroom Library by keeping all but the year folder I’m using un-expanded. As an example, my date folder label is 2009-02-15, for a Feb. 15th, 2009 shoot, and it goes into Pictures/2009/. I don’t much care if the morning shoot was birds in Seattle, and that evening was historic buildings in Sitka, AK. The images are text (keyword), star rating and/or date searchable using the Library Filter. I’ve completely gotten away from grouping images by location, or trip, or subject, like in the film days. Digital is a different animal. If putting your images in date-only folders is too scary, tack a custom label on the end of the folder name so when you’re looking at the folder column you’ll have an indicator of the content. And for same date shoots, one could be, say, 2008-05-20_Seattle and another 2008-05-20_Sitka.
For individual file names, I select all images in the folder, and then do a group re-name with a custom preset that again starts with the date. I only have to add a short custom name that’s part of the preset. The preset automatically adds a three-digit sequential number. For example, if I’m shooting at the Seattle Arboretum, a file name may look like this: 20090110_arb_001.
However you design your workflow, it’s important to be consistent, so you don’t, for example, get out in the field and discover you have a card full of images, and then wonder if you’ve backed them up. Too, Lightroom isn’t for everyone, though it works on both Mac and PC. If you only work on select images to optimize for printing or for web publishing, rarely do submissions, or perhaps you only shoot jpg’s, you may have little reason to go the Lightroom route.
Isn’t Lightroom slow and hard to learn?
Some people think Lightroom is slow, a reason to reject it. Yeah, if you shoot 4,000 images a day and need to sort them quickly, possibly Breezebrowser or PhotoMechanic is better for that, but then what? How do you organize? How do you find your images? How do you develop them all? How do you efficiently collect images for submissions, article ideas, club slide shows? Many pros import into Lightroom after a PhotoMechanic or BreezeBrowser sort. I do confess I’ve had to upgrade my computer a few times shortly after a Lightroom upgrade because the old computer couldn’t match the demands of new software, but this is increasingly a non-issue. Video editing is what drives computer upgrades today, from software other than Lightroom. Still, Lightroom, like Photoshop CC, is demanding, but unlike Photoshop, Lightroom isn’t difficult to learn. Free on-line tutorials by gurus like Julianne Kost will get you up and running, without having to attend workshops or delve into books.
How do you keep your camera equipment dry?
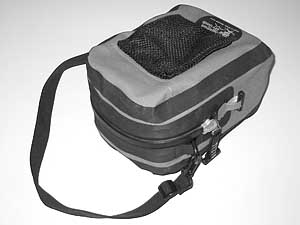
My camera sits in a unpadded Sagebrush Nose Bag that’s located between my legs and under my spray skirt. I pop the skirt and pull the zipper to open it. Sagebrush bags have a tough urethane skin, all-welded seams and a reliable waterproof TIZIP Masterseal zipper . My Sony A6700 w/300mm f2.8 and lens hood attached just fits inside the Nose Bag. The Sagebrush Midship Bag, 25” long, will fit many pro bodies with a somewhat longer telephoto lens. Other options are the padded Cam Dry Bags, big enough for a 35mm camera body with 28-135mm zoom and lens hood mounted for action. If you need something bigger, Sagebrush will make a custom bag to your specifications. I have huge confidence their gear, superior in every way a dry box, and the zippered bags won’t leak when submerged like a roll-up closure.
Extra lenses, filters, and film are kept in a hard plastic waterproof (Pelican) case that I only open on shore. I also carry silica gel, a desiccant that I keep in double zip-locked bags. If moisture gets on the camera or in the dry bag, I open the ziplocks and let the desiccant dry things out. The drying power of the silica gel can be renewed by putting it in an oven at low temperature for a hour. It can also be rejuvenated with a camp stove if you really need it in the field. When the gel turns color from pink to blue it’s good to go again. I’ve tried using a microwave to rejuvenate gel, but it drives the water out so fast it explodes the gel granules, so I only do that in a pinch.
A big problem for me is keeping my hands dry. I do open ocean paddling, where waves and ocean swell mean your hands frequently enter the water. Often they end up looking like prunes. If you grip the paddle with your hands close together to keep them out of the water, it can result in injury. One solution is to wear latex (dish washing) gloves, and remove them to take a picture. I sometimes keep a cotton bandanna under my hat, and always another one in the camera bag. I use them to dry my hands, and to wipe off the camera. If the bandana in the camera bag gets damp, I put it below deck, and rinse and dry it out when in camp. On windy days or in rough seas, I stop photographing, and concentrate on paddling.
I’m always looking for new solutions to these problems. If you’d like to share yours, send me an email at: gluhm@garyluhm.net.
Your pictures look so crystal clear. How do you achieve that?
Aside from camera and lens choice, I always shoot with a lens hood. This accomplishes three things. First, the lens hood protects the front lens element probably better than a lens cap, so I can leave the cap off. Second, the hood keeps water spray from striking the lens. Now I don’t have to clean the lens as much, and I’m less likely to need a filter for lens protection. Third—and most important—the hood prevents stray light from the sun or bright sky from bouncing around in the glass, causing lens flare and reducing contrast. Outdoors, we have only limited control over light and its direction. So I always shoot with a lens hood.
How do you get sharp pictures by kayak?
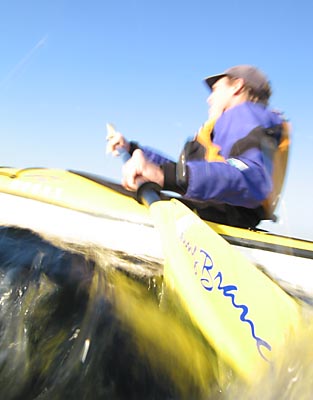
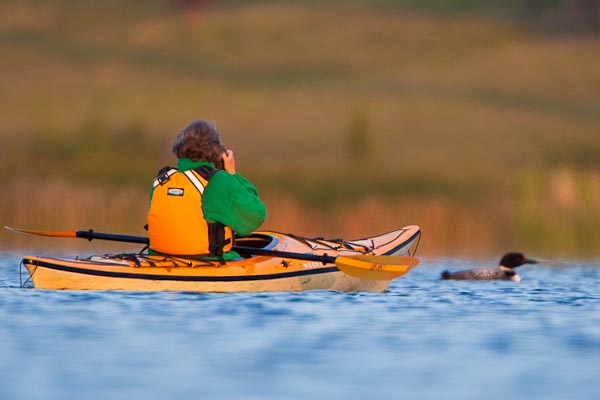
When I’m photographing I try to face forward while seated in the cockpit. I hunch over – push my elbows into my PFD. If it’s calm I lean my elbows on the coaming, or get lower by placing the (telephoto) lens on a deck bag. A bad way to photograph is to turn your body sideways to the kayak before snapping the shutter. This is an unstable position and the result will be fuzzy images and crooked horizons.
What kayak do you use? Any advice on kayak choice?
Note: I paddle sea kayaks, generally capable for ocean travel, not recreational kayaks. I also haven’t kept up with the manufacturers offerings, which I find disappointing because the market for sea kayaks has collapsed in the USA.
I’m paddling all Necky kayaks, with three in the fleet (four with my wife’s Looksha IV). I’ve sold my beloved Mariner Coaster, my big trip Mariner Max and my fast, skinny Necky Tahsis. The Broze brothers (Mariner Kayaks) closed their doors a few years ago. I had a business relationship with Necky, but Necky, too, has closed it’s doors. Owner Johnson Outdoors moved most of their assets to subsidiary Old Town in Maine.
My go to kayak now is a Necky Elias, only 15’ 6” in length. I’ve found it’s fast enough, though, and has plenty of volume for week-long or longer trips (see Photographer Kayak: Necky Elias). The short length may seem like a handicap, but shorter boats turn better and weigh less, and I can keep pace with almost any group I might paddle with. I’m still very fond of my Necky Eliza, a boat marketed to women but which is an excellent choice for small- to medium-sized guys or gals looking for a utility kayak that shines in surf and current play, has the capacity for a multi-day trip, paddles easily at a 3.5-knot pace and is so light I can (some time ago) pick it up with one arm (See my photo tip: Packing a small sea kayak).
In spring, 2009, I acquired a Necky Manitou 14, now (almost) a dedicated bird photography kayak. It’s great for photographing birds with a 500mm f/4. It has bomber stability for hand-holding the 500mm f/4 with confidence, and the cockpit has a huge amount of room to stow a big lens and still have quick access. The water line of the Manitou is long enough to quickly get you to photo ops, and it has enough gear stowage for an over-night (See my photo tip: Bird Photographer Kayak). It also has a skeg, which I prefer, not a rudder. I like dropping the skeg to keep me faced forward while photographing, and I like the firm footrests. At a weight of 44 lbs, it’s not super-light compared to other smallish kayaks, a consideration of women and older photographers who don’t want to deal with car-topping and carrying solo a 44 lb kayak when on day trips (Note: Most single kayaks weight more, some a lot more, but in its class there are a few lighter alternatives, especially in light-weight carbon-fiber and in shorter kayaks that often lack bulkheads, rudders or skegs).
In general—considering multi-day, touring kayaks—a medium-volume kayak is probably the best choice for most photographers. A big volume kayak can be a lot to handle, so paddling skills are even more important. Most folks should probably opt for something smaller than a 17’ Looksha Elite or Mariner Max, boats I once paddled. Photographers especially should seek to shrink the volume of stuff that they carry. My advice is to get your gear into a boat that fits you for size and is easy to handle. For example, I used my 21” beam Necky Tahsis, for a two-week trip to Bella Bella in July, 2005. I took my big gun 500mm f/4, and all my usual photo gear. I loved paddling that kayak, loaded, or not loaded, with gear. The Tahsis is fast and tippy and I wouldn’t recommend it for photography, but with an excellent secondary I never worried about capsize while photographing from the cockpit. I kept the 500mm in a Sagebrush bag.
For overnights I love paddling my Necky Eliza, which loaded or not has such low windage it’s a joy to paddle when storms roll in. The Necky Eliza is a kayak any small to medium-sized paddler should consider, although the cockpit is way too small for photographers with big telephoto primes.
If you really feel you need for a big volume bulk carrier (as big or bigger than the Mariner Max) for extended camping trips, two other kayaks I would recommend for male photographers are the Prijon Kodiak and the Azul Aspen.
Any suggestions for wildlife photography?
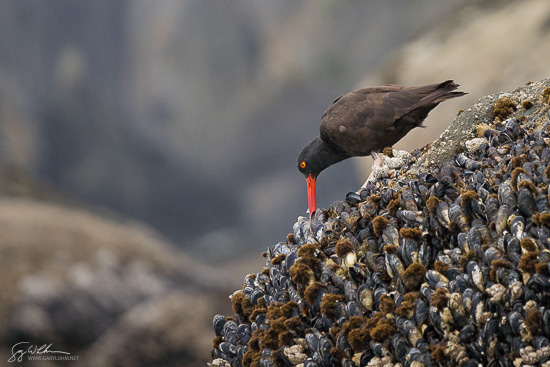
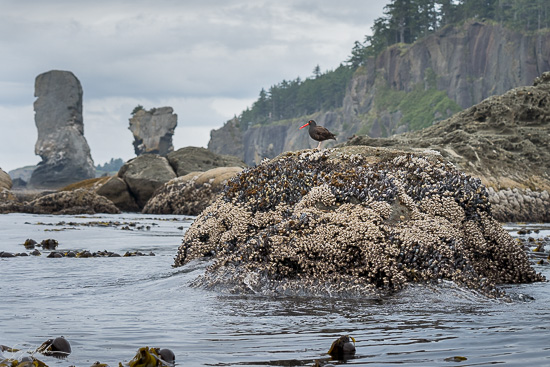
Yes. Learn natural history. Get excited about animals. Get out every day, even if it’s only for 20 minutes to look at birds in a city park. Be patient. Carry waterproof binoculars and use them to study subjects at a distance. Especially, shoot locally. It’s better for the planet, and has gratifying rewards. Target a local species and keep after it season after season. Dig in and persist and you’ll become a local wildlife guru.

As well, the emphasis for wildlife photographers has always been to get close, use the biggest telephoto in your arsenal and show the bird or mammal large in the frame with a bokeh background. Work to be different, perhaps by putting the animal small in the frame and using a wide-angle lens triggered by your smartphone, now easy to do. Show more of the environment where the animal lives, or place it as a part of the big scenic. These types of shots take some thought and often time to set up.
Whatever you do, don’t feed them. A wild animal that associates food with people often ends up a pest, or dead, or results in the closure of a wild area to people. The (summer, 2000) mauling of a sea kayaker on Vargas Island, BC, by a wild wolf is a case in point. It was reported that this wolf had been fed previously by people, became habituated, and was probably looking for a handout.
One other thought: never use rat poison! Rats die a horrible death, but before they die the become crazy, may stumble about in daylight, and get eaten, especially by owls, coyotes or bobcats. Owls die, bigger mammals get sick, lose their hair, may die as well. We no longer have a bird feeder because it attracted rats. But every year, many of our garden fruits and vegetables also attract rats, so we put out an old-fashioned spring-operated rat trap that kills them instantly. Importantly, we set the traps at dusk, placed in a milk-carton cage so raccoons, etc. don’t get snapped, and retrieve it pre-dawn, so non-target day-shift birds or mammals won’t get caught.
Just to repeat: learn, learn, learn natural history.
What would you choose for a wildlife lens?
Anything more to say about bigger lenses, like a 500mm or 600mm?
Regarding kayaking, I love my Canon 500mm f/4, but I’ve often carried it (or its predecessor, the Canon 500mm f/4.5L) for weeks on kayak trips and it didn’t get used. It’s too big to use from the cockpit of most kayaks, or for use in rough water. To stop and set up for shots takes extra effort, so you want to have a good situation. Of course, the results are often worth it. For car camping I store the 500mm in a waterproof case, a Tundra 716, but for kayak trips I now stow it in a Sagebrush Dry Twin Center Bag which then fits into the rear oval hatch (see photographer kayak. On calm water bird photo outings, I can stow the 500mm in the cockpit if I choose, but I no longer do that and instead stow the Sony 300mm f2.8 with its fast auto-focus, faster shutter speeds, low-light capability and convenience.
While I envy many a photo taken with a 600mm f/4, a lens that expensive has to be a workhorse. It’s rather impractical to carry a 600mm f/4 by kayak, where on the water or off near camp I get much of my photography. A 500mm f/4 is easier to carry, and more hand-holdable, but as I said the 300mm f2.8 is now my go-to. The 600mm f/4, of course, shines for stand-on-the-shore photography of subjects like surfing or sailing, or bears, or distant birds. Personally, I enjoy the challenge of finding situations closer to the action, of which there are many.
Always reset your camera to the same settings after a shoot, set to your familiar, go-to settings. An hour later, the next day, or whenever you pull your camera out again you need to know that your set-up is the same. If you only have seconds to shoot, and you’ve got yesterday’s exposure compensation dialed in or yesterday’s f-stop or worse you’re in 2-second time delay – whatever it is – you’ve just lost the shot.
I leave my camera in Manual Mode, aperture set wide open, ISO 800. I always want to control aperture, and ISO 800 is a reasonable ISO so I only need a quick shutter-speed change to get the exposure right. I prefer Manual exposure mode because when a bird or other subject moves between dark and light backgrounds the exposure for the subject doesn’t change.
I would like to purchase one of your deep forest Olympic shots with the bridge (very green) – how much do you charge for a 24×34 or 36 – water proof – on metal?
Thank you,
Charlotte Twardus
dropngo@yahoo.com