A camera’s histogram is a great field tool, among the best of tools in a digital photographer’s kit. It’s in the review mode built into almost every camera; some cameras even have it “live”. So take advantage of it. Learn how to use the histogram.
As photographers, we’re always pushing the review button to see if we captured the moment. If we also examine the histogram, we prove whether we got it right. Consider this: the camera’s built-in exposure meter gives you a single, “averaged” point to determine exposure. Then we add or subtract light based on our experience. The historgram feeds back all the points—the whole range. Knowing how to use that extensive information takes the guesswork out of exposure compensation.
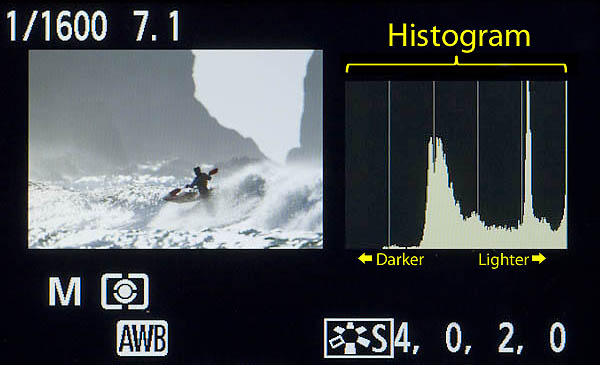
The histogram is a graphical representation of all the tones (*brightness values) of an image. Horizontally, dark tones are on the left, mid-tones in the middle, light tones on the right. The vertical axis is the pixel tone count. A typical histogram has peaks and valleys. Peaks represent the more frequented tones. An image’s histogram is normally divided into five sections with vertical lines. Going from line to line roughly represents a stop of light (a doubling of halving of the amount of light). The five sections thus represent the range of light available in a jpg image from a digital sensor.
Histogram tones that are totally black or totally white are called “pegged”. They show up as a vertical line at the left and right edge of the graph. Pegged whites lack detail—they’re “washed out”. Pegged blacks lack information as well, like a silhouette. (As an aside, if you shoot RAW, you can gain about a stop on each end in post-shoot processing—recovering some of those pegged pixels. This is one reason many photographers shoot RAW.)
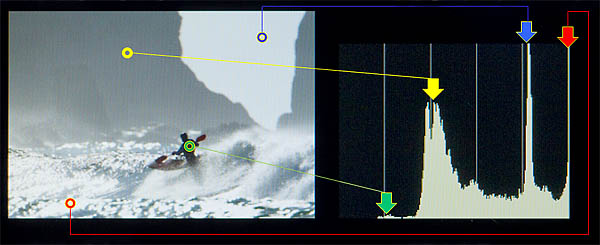
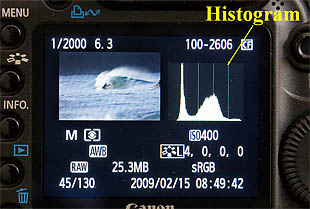
The example image (from my Canon 7D) shows an overall bright image (pixels shifted to the right). There are no pure blacks, almost nothing in the first (darkest) section. The whites, on the other hand, are well-represented, and quite a few are “pegged”. Examine the image and graph on the left. Notice the correlation of tonally similar areas of the image with the spikes on the histogram.
Best exposures usually favor the right, toward overexposure, though without blowing out the whites. In general, this reduces noise and posterization which are more prevalent in the darks. Favoring the right maximizes the signal-to-noise ratio. But because blown whites are a big concern—and they do tend to draw the eye—camera manufacturers often provide a highlight alert option, highlighting the pegged whites from the histogram. Turned on in MENU→REVIEW in Canon dSLR’s, highlight alert causes overexposed pixels in the image to blink on and off. So when you see “the blinkies”, you’ll need to decide if the lost data is important, and if so, underexpose the next shot relative to your last exposure.
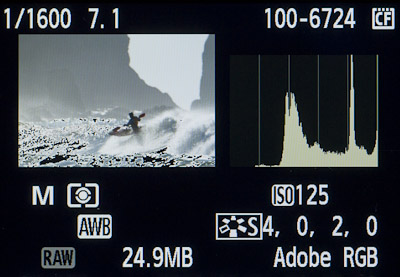
In this example, when I saw the pegged whites and the “blinkies” in the field I got concerned. I subsequently dropped the exposure a bit, but when I did so I lost detail in the backlit kayaker(s). I didn’t improve the overall images. The blown whites here are from reflected sunlight on the water, and—like specular highlights—mostly can’t be recovered. Overall, I’d say this exposure was correct, and I’m sure glad I had the histogram to aid my decision-making.
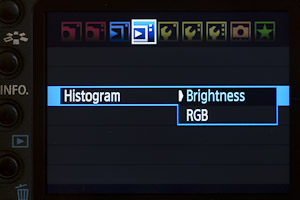
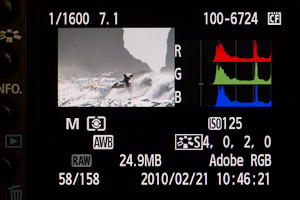
*Note: I’ve set up my cameras to show the default “brightness” histogram, rather than RGB. This toggle is found in the (Canon) MENU→REVIEW (blue arrow) settings. The RGB histogram can be useful for setting white balance and checking saturation, but I don’t concern myself with that in the field (another reason to shoot RAW).
Gary