Adobe updated Lightroom Classic CC last week (October, 2018). Two additions of interest to me are the One-step Merge to Panorama and the new Color/Luminance Range Mask. The One-step Merge creates HDR panoramas with a single select and click, where beforehand you needed the separate steps of creating multiple HDR images, and then select and merge them to a pano. I found One-step worked perfectly in Windows. The Range Mask not so much.
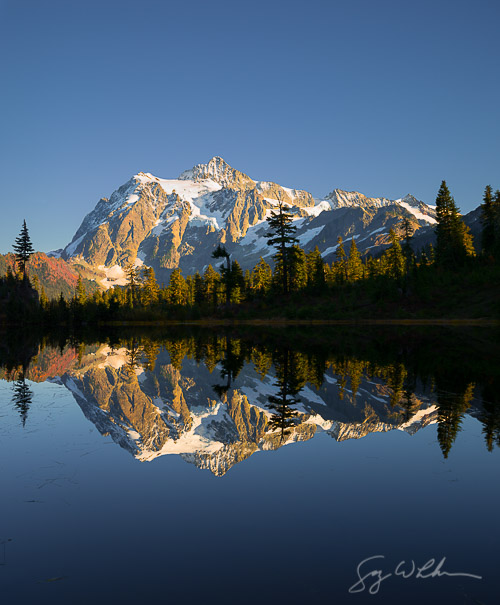
The day Adobe alerted me to the new Lightroom CC features, I tried the One-step Merge on a just shot Mt Shuksan reflection at Picture Lake, WA. It worked flawlessly, and saved time, but it was an easy merge to test. All three projection options (Spherical, Cylindrical, Perspective) quickly merged.
Later in the week, at Eunice Lake at Mt. Rainer, I found a more demanding test. I shot a bracketed 3×3, or 9 image, panorama that included some close foreground. Panorama software often has trouble with foregrounds due to parallax. Anticipating this difficulty, I slid my Sony A7 III camera back on the ball head, and shot a matrix of horizontal frames to keep the sensor centered.
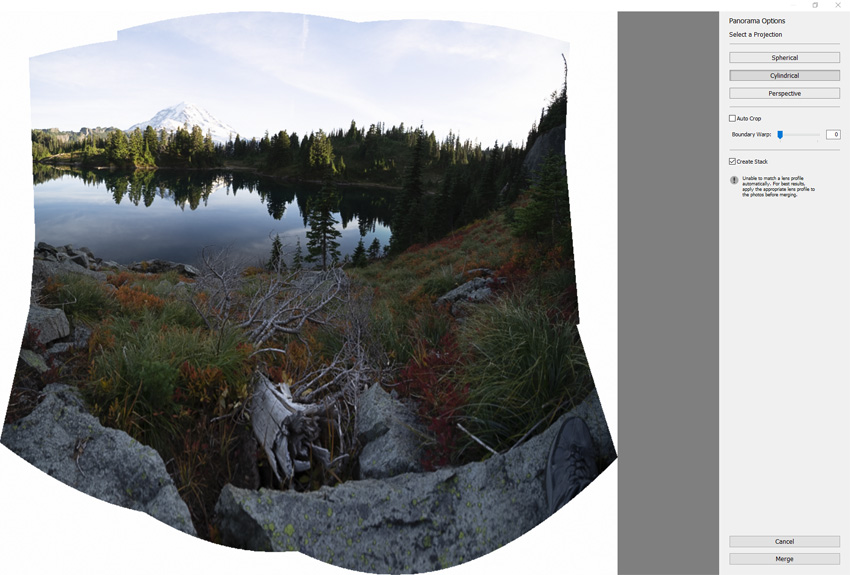
Back home in Lightroom, I selected 9 pairs of bracketed images and opened the Panorama dialogue box (Ctrl+M in Windows). In this case, the Cylindrical projection made the best Merge (Perspective didn’t merge at all). I elected not to use Boundary Warp, because the warping was quite severe.
Adjustments to the merged file included Highlight and Shadows, selective Saturation and Luminosity, and an Adjustment Brush to darken the sky. I exported the result into Photoshop to fill in the corners with the Clone tool, straighten the horizon and to crop. Then back to Lightroom for finishing. The image exceeds 80 MP, from a 24 MP sensor.

The One-step Merge saved a bunch of time and worked great, even in this case where I elected to go to Photoshop. However, even for someone like me with a bias to stay in Lightroom, this new Merge option doesn’t change the need for Photoshop.
I also attempted to alter the sky using the new Range Mask feature. My thought was if I could selectively warm up already warm bits of clouds, it could provide a more dramatic contrast to the cool blue sky and foreground. My hope was that Range Mask would reduced the need for Photoshop. My result looked ham-fisted, though, much like attempting the same thing with the old Adjustment Brush. For now, for people skilled in Luminosity masks in Photoshop, the Range Mask tool isn’t a threat.
Comments appreciated,
Gary
Addendum 10/22/2018
I did some additional testing of the new Range Mask feature, exploring the use of the Color mask, as well as Luminosity. Both masks seem difficult to get right. I used the Graduated Filter tool and the Color Mask on the Eunice Lake image to select warmish clouds and then warm them further. I think I succeeded with this, but I still prefer the less altered sky posted above. It does have potential.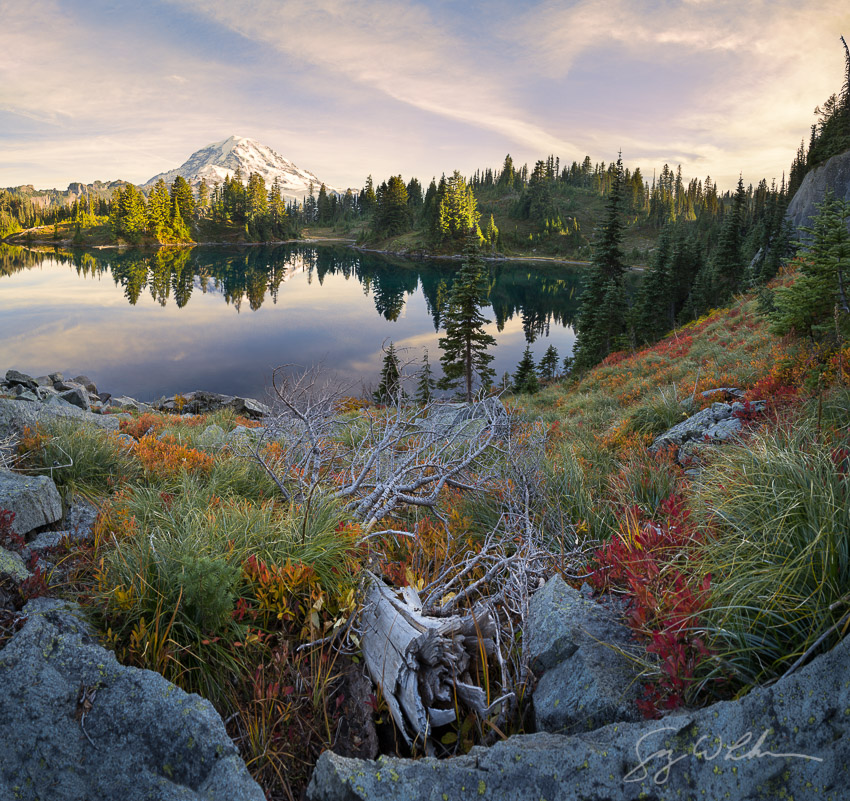
Wow. Beautiful. A pleasure to stare at.
Gee Gary these are marvelous! I love the sound of One-step Merge. I do guess its a little more complicated than that. Thanks for sharing this info!
Thanks, Laurie. One-step Merge isn’t complicated. The challenge is more in imagining the composition, and then not goofing up the pan sequence.